Viewing and Editing Meta Data in Visual Basic (VB6)
We have an example project for VB 6 that shows how to use the csXImage ActiveX control to view and edit meta data in JPG and TIFF images. Download the project code.
The demo uses the trial version of csXImage, which must must be registered on the development computer and the licence file must be in the same folder as the .ocx control. Running our installer will have performed the registration and unpacking of files.
The Combo Boxes that contain the various options are set when the form loads, so that their values are easier to see by viewing the code. What is less easy to see is that there are a number of Frame controls that are on top of each other and each of these is used to display the different sections of the meta data values. The frame that is displayed at the front is selected by the Combo Box.
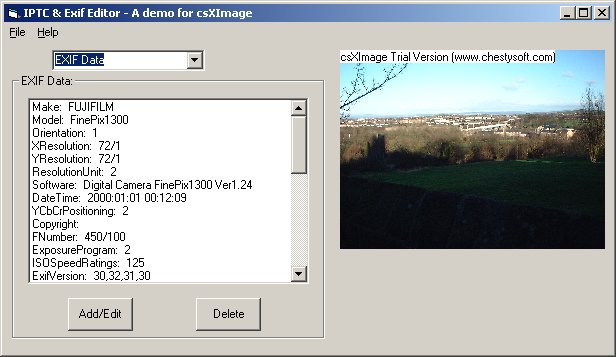
When the application runs the user can open a JPEG or TIFF file for viewing. The file is selected using the Common Dialogue control and the LoadFromFile csXImage method. Below is a screenshot after loading an image and selecting the EXIF Data frame.

When the image is loaded the following code is run to fill the text fields in the frames. Most of the IPTC fields are exposed as string properties so it is a simple matter of reading them and copying them to a caption on the form. In csXImage the IPTC properties are prefixed with FFO_ (for File Info). Caption, CaptionWriter, Headline and SpecialInstructions are examples of these properties. The keywords and supplementary categories are an exception because these allow multiple values. It requires a loop using the count property to read these values into a list box. Urgency is another exception because it contains a number. The Date Created is converted into a short date using the VB Format function.
The Exif data is stored in csXImage as an array of strings, with some helper functions to allow reading and writing. The ExifCount property is used to define a loop and each Exif property and its name is read and added to a list box.
Private Sub ReadFileInfo()
Dim i As Integer
With ImageBox1
If .ImageLoaded Then
' Caption
txtCaption.Text = .FFO_Caption
txtCaptionWriter.Text = .FFO_CaptionWriter
txtHeadline.Text = .FFO_Headline
txtSpecInst.Text = .FFO_SpecialInstructions
' Keywords
lstKeywords.Clear
For i = 0 To .FFO_KeywordsCount - 1
lstKeywords.AddItem .FFO_Keywords(i)
Next i
' Categories
txtCategory.Text = .FFO_Category
lstSupCats.Clear
For i = 0 To .FFO_SuppCatCount - 1
lstSupCats.AddItem .FFO_SuppCat(i)
Next i
If .FFO_Urgency <> 0 Then
cboUrgency.Text = Str(.FFO_Urgency)
Else
cboUrgency.Text = "None"
End If
' Credits
txtByline.Text = .FFO_Byline
txtBylineTitle.Text = .FFO_BylineTitle
txtCredit.Text = .FFO_Credit
txtSource.Text = .FFO_Source
' Origin
txtObjectName.Text = .FFO_ObjectName
txtDate.Text = Format(.FFO_DateCreated, "Short Date")
txtCity.Text = .FFO_City
txtProvince.Text = .FFO_ProvinceState
txtCountry.Text = .FFO_CountryName
txtOTR.Text = .FFO_OTR
' Copyright & URL
If .FFO_CopyrightFlag Then
chkIsCopyright.Value = 1
Else
chkIsCopyright.Value = 0
End If
txtCopyright.Text = .FFO_CopyrightNotice
txtImageURL.Text = .FFO_ImageURL
' Creator Contact
txtCreator.Text = .FFO_Author
txtAddress.Text = .FFO_CiAdrExtAdr
txtCity2.Text = .FFO_CiAdrCity
txtRegion.Text = .FFO_CiAdrRegion
txtPostCode.Text = .FFO_CiAdrPcode
txtCountry2.Text = .FFO_CiAdrCtry
' Exif Data
lstExif.Clear
For i = 0 To .ExifCount - 1
lstExif.AddItem .ExifName(i) & ": " & .ExifValueByIndex(i)
Next i
End If
End With
End Sub
Writing the IPTC data after editing is just the reverse process to reading and it is carried out by the WriteFileInfo function in the demo project. Here is an extract from that function. The keywords are aded singly using FFO_KeywordsAdd.
' Caption
.FFO_Caption = txtCaption.Text
.FFO_CaptionWriter = txtCaptionWriter.Text
.FFO_Headline = txtHeadline.Text
.FFO_SpecialInstructions = txtSpecInst.Text
' Keywords
.FFO_KeywordsClear
For i = 0 To lstKeywords.ListCount - 1
.FFO_KeywordsAdd lstKeywords.List(i)
Next i
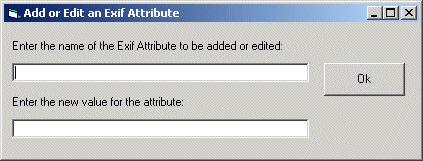
Exif attributes are edited using another form, shown below.

The following code is used by the form to collect the Exif tag name and its new value and then the form closes itself.
Private Sub cmdAddOk_Click()
ExifAttName = txtAddName.Text
ExifAttVal = txtAddVal.Text
Unload Me
End Sub
Here is the code that calls the modal form and processes the data returned. ExifSetAttribute requires the exact name of the Exif attribute and the new value as a string, even if the attribute is a numerical or date value. It returns a value of true if the attribute is set successfully. Exif values are usually set by the device which creates the image and it is unlikely that there will be a need to set them later, except perhaps the ImageDescription or one of the date/time values.
Private Sub cmdExifAdd_Click()
Dim AddForm As fAdd
Set AddForm = New fAdd
AddForm.Show vbModal
Set AddForm = Nothing
If Not ImageBox1.ExifSetAttribute(ExifAttName, ExifAttVal) Then
MsgBox "Invalid Exif Attribute Specification"
End If
ExifUpdate
End Sub
- Visual Basic examples using csXImage.
- Loading, saving and adding effects.
- Zoom - An example of zooming an image.
- Rubber Band - Drawing a line with "Rubber Banding".
- Selecting an area - Drawing a selection area with "Rubber Banding".
- Unicode - An example of adding text to an image in Unicode characters.
- TWAIN - An example of capturing an image from a TWAIN compliant scanner or camera.
- ADF - An example of scanning multiple images from a scanner with an Auto Document Feed.
- Multi-page TIFF - View edit or scan multi-page TIFF images.

