
csXImage Version 5.0 - Online Manual
Introduction
These instructions are also available in pdf format. We recommend using the PDF version if a printable manual is required.
This is an OCX control that enables processing of graphic images. A comprehensive range of over 200 functions is available to load and save images, resize and edit images, draw text and shapes and interact with hardware devices such as printers, scanners and cameras. Most commonly used graphics file formats are supported.
A free trial version of csXImage is available. If you are reading this instruction manual for the first time, it is likely that you have just downloaded and installed the trial version. When you use the trial version, a line of text will be displayed at the top of any image as you view it in the control. The trial version is fully functional, with the exception of three methods (AcquireToFile, ReadMetaData and OverwriteMetaData) which are available only in the full version and the addition of this text to your image is the only other difference between the trial and full versions. This means that you can fully test whether this control is suitable for your application before considering whether to license the full version.
Using these Instructions
These instructions are divided into a number of sections covering different types of functions available in csXImage. A full Table of Contents is available below and an index listing all functions in Alphabetical order is included at the end for easy reference.
Click on one of the links below to go directly to the section of interest:
Table of Contents
- 1. Import and Export of Images
- 1.1. Saving and Loading Files To/From Disk
- 1.2. Image Transfer via the Internet
- 1.3. Clipboard Operations
- 1.4. Exchanging Images with Other Controls
- 1.5. Storing Images in Memory
- 1.6. Base64 Encoding
- 1.7. Screen Capture
- 1.8. File Drag & Drop
- 1.9. Supported Graphics File Formats
- 1.9.1. BMP (Bitmap)
- 1.9.2. TIFF or TIF (Tagged Image File Format)
- 1.9.3. JPEG or JPG (Joint Photographic Experts Group)
- 1.9.4. GIF (Graphics Interchange Format)
- 1.9.5. PSD (Photoshop Format)
- 1.9.6. PNG (Portable Network Graphics)
- 1.9.7. PCX Format
- 1.9.8. WBMP or WBM (Wireless Bitmap)
- 1.9.9. PDF (Portable Document Format)
- 2. Image Properties
- 3. Resizing and Rotating Images
- 4. Modifying and Enhancing the Image
- 5. Merging Images and Watermarking
- 6. Transparency
- 7. Drawing
- 7.1. Pen and Brush Properties
- 7.2. Drawing Lines
- 7.3. Drawing Shapes
- 7.4. Drawing Text
- 8. Interacting with Hardware (Printers, Scanners and Cameras)
- 8.1. Printers
- 8.2. Scanners and Cameras (TWAIN)
- 8.2.1 Information about TWAIN
- 8.2.2 Selecting the Device
- 8.2.3 Device Configuration
- 8.2.4 Acquiring the Image
- 8.2.5 Acquiring Multiple Images
- 8.2.6 Miscellaneous TWAIN Functions
- 9. Display Options
- 10. Selecting a Region of an Image
- 11. Events
- 12. File Info (JPEG Meta Data) and EXIF Attributes
- 12.1. File Info (JPEG Meta Data) or IPTC Text
- 12.1.1 File Info Properties
- 12.1.2 IPTC Core Properties (XMP)
- 12.1.3 Other XMP Properties: Rating and Rating Percent
- 12.1.4 File Info Methods
- 12.2. Exif Attributes
- 12.2.1 Reading Exif Attributes
- 12.2.2 Writing Exif Attributes
- 12.2.3 Exif Data Types
- 12.3 Exif Helper Functions
- 12.4 Exif Thumbnails
- 12.5. XP Summary Information
- 12.6. Trailing Meta Data
- 13. Miscellaneous Functions
- 14. Installation, Getting Started and Deployment
- 14.1. Installation in the Development Environment
- 14.2. Getting Started
- 14.2.1 Code Examples
- 14.3. Deployment of the Control with an Application
- 15. Use in Visual Basic.NET
- 15.1. Installation in VB.NET
- 15.2. Dynamic Creation of Control Instances
- 15.3. Enumerations
- 15.4. Events
- 15.5. Colours
- 15.6. Fonts
- 15.7. Indexed Properties
- 15.8. Exchanging Images with PictureBox Control
- 15.9. Creating an Installer for a VB.NET Project
- 15.10. Miscellaneous VB.NET Issues
- 16. Use as a Client Side Control in a Browser
- 16.1. The Licence File
- 16.2. Distributing the OCX File
- 16.3. Calling the Control
- 16.4. Changing the Version Number
- 16.5. Security Settings in Internet Explorer
- 16.6. Examples
- 17. Revision History
- 18. Other Products from Chestysoft
- 19. Enumerations
- 20. Alphabetical List of Functions
1. Import and Export of Images
Images can be read into the control and exported from the control in several different ways. The most common method is to load files from disk and save files to disk. Alternatively, images can be read from a remote URL via the internet, pasted to a web page, uploaded by FTP, copied to or pasted from the clipboard, transferred to/from other image controls, saved as binary data in a memory buffer or captured from screen. Image files can be dragged and dropped onto the control. Images can also be read from scanners and cameras or sent to printers. This functionality is described in Section 8.
1.1. Saving and Loading Files To/From Disk
Images are loaded into the control using LoadFromFile and saved to disk using SaveToFile.
LoadFromFile (FileName As String) - Reads the file from disk, loads the image into the control and displays the image. FileName must be a complete path to the file. The following file types are supported: .bmp, .gif, .jpg, .jpeg, .jpe, .png, .wbmp, .wbm, .pcx, .psd, .tif, .tiff and .pdf. csXImage will recognise the file format from the file content even if the file has an incorrect or missing extension.
To load images from .pdf files, use OpenPDF and related functions instead.
LoadDialog ( ) As Boolean - Displays a standard File Open dialogue box allowing the user to browse to an image file on disk, which is then loaded. The return value is True if a file is loaded and False if the user clicks the Cancel button or an error occurs when loading the file.
ImageCount (FileName As String) As Long - Read-only property. Gives the number of images contained within a file. FileName must be a complete path to the file, including the file extension. Note that reading of multiple images is only possible with TIFF or PDF files, so for other files this function will normally return the value 1.
FileName can alternatively be either (1) a full HTTP reference to a remote URL, beginning with "http://" or "https://", or (2) an image encoded as a string in Base64 format.
ReadImageNumber As Long - Specifies the image that will be read from a file or a variant array in TIFF or PDF format containing multiple images. This property is used by the LoadFromFile, LoadFromURL and ReadBinary2 methods. (Default = 1).
SaveToFile (FileName As String) - Saves the file to disk. FileName must be a complete path to the file, including the file extension. The extension must be .bmp, .gif, .jpg, .jpeg, .jpe, .png, .wbmp, .wbm, .pcx, .psd, .tif, .tiff or .pdf. If it is .gif or .png, transparency will be defined by the Transparent and BGColor properties. If it is .jpg, .jpeg or .jpe, the compression quality will be defined by the JPEGQuality property. If the file already exists, it will be overwritten without warning.
If UseSelection is True, SaveToFile will save only the selected region of the image.
SaveDialog ( ) As Boolean - Displays a standard File Save dialogue box allowing the user to save an image to disk. The return value is True if a file is saved and False if the user clicks the Cancel button or an error occurs when saving the file.
NewFileSize (Format As TxGraphicsFormat) As Long - Returns the file size in bytes if the current image is saved to disk in the graphics format given in Format, which can take one of the following values:
- gfBMP : Bitmap format
- gfGIF : GIF format
- gfJPG : JPEG format
- gfPCX : PCX format
- gfPNG : PNG format
- gfWBMP : Wireless Bitmap format
- gfPSD : Adobe Photoshop format
- gfTIF : TIFF format
- gfPDF : Portable Document Format
If UseSelection is True, NewFileSize will return the file size if only the selected region of the image is saved to disk.
If FileType is gfPDF or gfTIF and a multi-page PDF or TIFF has been created in memory using the AddToPDF or AddToTIF function, the size of the prepared multi-page PDF or TIFF file will be returned instead of the file size of the current image.
LastFileName As String - Read-only property. Returns the full path and name of the last file that was loaded using the LoadFromFile, LoadDialog or LoadFromURL commands, or saved using the SaveToFile, SaveDialog, WriteTIF, WriteTIFDialog, WritePDF or WritePDFDialog commands, whichever was most recent.
PDF is not an image file format and these files are treated differently for loading images. Images can be present in PDF files as embedded objects and csXImage can find and extract some of these images. Due to wide variation in the formatting of images and methods of embedding them in PDF files, csXImage is not guaranteed to read all images from all files.
Images in PDF files do not necessarily correspond to pages in the document. Therefore, csXImage does not convert PDF pages to images and is not a PDF viewer.
Images in PDF files can be read using LoadFromFile and LoadFromURL, but for PDF files containing multiple images it can be more efficient to use the following functions to load the PDF contents into memory and then extract images from it.
OpenPDF (FileName As String) - Loads the contents of a PDF file into memory prior to using the LoadPDFImage method to extract images from the file.
OpenPDFDialog ( ) As Boolean - Displays a standard File Open dialogue box allowing the user to browse to a PDF file on disk, which is then loaded for extraction of images as if using OpenPDF. The return value is True if a file is loaded and False if the user clicks the Cancel button or an error occurs when loading the file.
OpenPDFFromURL (URL As String) - Loads the contents of a PDF file into from a URL. This function operates in a similar way to the LoadFromURL function.
ClosePDF ( ) - Releases the memory used by OpenPDF. It is not strictly necessary to call this function as the memory will be released on a later call to OpenPDF or when the instance of csXImage is itself unloaded.
PDFImageCount As Long - Read-only property. Returns the number of images that csXImage can find in the PDF file currently loaded using OpenPDF.
LoadPDFImage (Index As Long) - Loads the image indicated by Index from the current PDF file.
The following VB code shows how to use the above functions:
ImageBox1.OpenPDF "filename"
If ImageBox1.PDFImageCount >= 1 Then
ImageBox1.LoadPDFImage 1
End If
ImageBox1.ClosePDF
1.2. Image Transfer via the Internet
Three functions are available to read images from and send images to a web site using HTTP. These are LoadFromURL, CopyBinaryFromURL and PostImage. As an alternative to PostImage, images can also be sent to an FTP server using the FTPImage function. Other functions detailed below support the operation of these functions.
LoadFromURL (URL As String) - Reads a file from a URL. URL must be a complete HTTP reference to the file. It is not necessary to include 'http://' at the start of the string. Note that on some operating systems used by web servers, e.g. UNIX, file names are case-sensitive, so incorrect use of upper/lower case may result in no image being loaded.
If the URL requires authentication a user name and password can be sent with the request by setting the properties URLUserName and URLPassword otherwise a dialogue will pop-up for the user to enter the user name and password.
When reading more than one image from a multi-page TIFF or PDF file, the LoadFromURL command will transfer the whole file each time a single image is read, which can be very time consuming. For this situation, the CopyBinaryFromURL command should be used instead. For PDF files the OpenPDFFromURL function is also an efficient option.
CopyBinaryFromURL (URL As String) As Variant - Reads a file from a URL and writes the contents of the file as binary data to an OLE Variant array. URL must be a complete HTTP reference to the file as for the LoadFromURL command. This command copies any file, but its main purpose is to enable the whole of a multi-page TIFF or PDF file to be read in one go and saved as binary data so that individual images can then be read using the ReadBinary2 command without requiring further data transfer.
HTTPTimeout As Long - The time before the LoadFromURL, CopyBinaryFromURL or PostImage methods will time-out if receiving no response. The value is the number of seconds. A value of zero means that there will be no time-out. (Default = 60).
URLUserName As String - The user name to be sent with a LoadFromURL or PostImage command if the server requires authentication.
URLPassword As String - The password to be sent with a LoadFromURL or PostImage command if the server requires authentication.
HTTPUserAgent As String - Specifies the user agent header sent with the HTTP request when LoadFromURL is called. This property can also be used when ImageCount is used with a URL.
PostImage (URL As String, FileName As String, FormVarName As String, FileType As TxGraphicsFormat) As Boolean - Uploads the image to a web server as a "multipart/form-data" HTTP POST. URL must be a fully qualified address (including 'http://') of a script, e.g., ASP, which is able to process the upload. This method emulates a POST as if it originated from a page of HTML using the <input type="file"> tag and HTML form variables can be included. FileName is the name of the file complete with extension. It can be an empty string, but the processing script may require a file name. FormVarName is the name of the form variable associated with the file, which can also be an empty string. The AddFormVar method is used to create additional form variables if they are required.
The image file format is specified by FileType. If FileType is gfPDF or gfTIF and a multi-page PDF or TIFF has been created in memory using the AddToPDF or AddToTIF function, the prepared multi-page PDF or TIFF file will be uploaded instead of the current image held in the control.
If the server requires authentication, the type of authentication must be set using the AuthenticationType property and the user name and password can be set using URLUserName and URLPassword. If the user name and password are not given, a dialogue will pop-up for user entry.
Return value will be False if PostImage fails, either because the connection to the URL failed or the script returned an error message.
AuthenticationType As TxAuthenticationType - The type of authentication required by the server for a call to the PostImage function. If Windows Integrated Authentication (NTLM) is to be used, this property must be set to atIntegrated otherwise the upload will fail. With Basic Authentication or no authentication, AuthenticationType must be set to atBasic. As this is the default value, the property can be left unused. The user name and password can be coded into the application by setting the URLUserName and URLPassword properties. If these properties are not set, a dialogue box will be used to collect the log in details from the user.
AuthenticationType can be either:
- atBasic - Basic Authentication, or no authentication (Default)
- atIntegrated - Windows Integrated Authentication (NTLM)
PostReturnFile As String - The contents of the file returned to the browser following a call to the PostImage function. This can be used to help debug the server side script receiving the posted image.
PostReturnCode As Long - The HTTP return code following a call to the PostImage function. This will normally be 200 for a successful post operation. A value of 0 indicates that the connection to the server failed and a value of 500 indicates an error in the server side script.
UseAuthenticationDialog As Boolean - Read/Write property. If this is set to True a dialogue will be displayed for the user to enter the uername and password if authentication is required when using PostImage. If the dialogue is not used, the values set for URLUserName and URLPassword will be used instead. (Default = False).
AddFormVar (Name As String, Value As String) - Adds an HTML form variable with the given Name and Value to the list of form variables that will be sent with the PostImage method. This list is automatically cleared after PostImage is executed.
FTPImage (FileName As String, HostName As String, FileType As TxGraphicsFormat) As Boolean - Uploads the image to an FTP server identified by HostName. FileName is the name of the file to be saved complete with extension and must include the path to the directory from the root directory of the FTP server. If the directory on the server does not already exist, it will be created.
The user name and password required to log into the FTP server can be set using URLUserName and URLPassword.
The image file format is specified by FileType. If FileType is gfPDF or gfTIF and a multi-page PDF or TIFF has been created in memory using the AddToPDF or AddToTIF function, the prepared multi-page PDF or TIFF file will be uploaded instead of the current image held in the control.
Return value will be False if FTPImage fails. In the case of failure, the FTPError property can be read to obtain an error message.
FTPPassiveMode As Boolean - If set to True, FTPImage will use passive mode, otherwise active mode is used. (Default = True).
FTPError As String - Read-only property. Returns an error message if the FTPImage function fails.
1.3. Clipboard Operations
csXImage can pass an image to the Windows clipboard or receive an image from the clipboard using the Copy and Paste functions.
Copy ( ) - Copies the currently loaded image to the Windows clipboard, in Bitmap format.
If UseSelection is True, Copy will only copy the selected region of the image.
Paste ( ) - Retrieves an image from the Windows clipboard, if one is available in an appropriate format. Paste replaces an image already loaded into the control, without warning.
1.4. Exchanging Images with Other Controls
The BMPHandle property provides a universal way of transferring an image to another control, or receiving an image that is already held in memory. Other functions are available with more specific uses.
BMPHandle As Long - Returns a Windows handle to a copy of the bitmap image. Setting this property copies the image referenced by the new handle value into the control. csXImage does not take ownership of the handle unless the ReleaseBMPHandle property has been set to False, in which case the original copy of the image will be freed from memory.
This property can be used, for example, to copy an image to csXImage from a VB PictureBox control, in which case, the syntax would be in the form:
ImageBox1.BMPHandle = Picture1.Picture.Handle
Likewise, an image can be copied from a VB Image control:
ImageBox1.BMPHandle = Image1.Picture.Handle
If an image is copied from the Image property of a VB PictureBox, the handle must not be released as the PictureBox will not clear the memory used for transferring the image and a memory leak will result. In this case, the following code should be used:
ImageBox1.ReleaseBMPHandle = False
ImageBox1.BMPHandle = Picture1.Image.Handle
The same applies if an image is copied from one instance of csXImage to another, i.e.:
ImageBox2.ReleaseBMPHandle = False
ImageBox2.BMPHandle = ImageBox1.BMPHandle
Note that the above two examples are the only known situations in which ReleaseBMPHandle should be set to False.
If UseSelection is True, the handle returned by BMPHandle will be of a bitmap including only the selected region of the image.
ReleaseBMPHandle As Boolean - This property is used to determine whether the handle is released to its original owner when the BMPHandle property is set. See above examples for further explanation. (Default = True).
Picture As IPictureDisp - Read-only property. Provides the image data in a format that can be transferred to any object with a "Picture" property, e.g. a PictureBox or ListImage in VB. For example, the following code copies an image from a csXImage object called "ImageBox1" to a VB PictureBox object called "Picture1":
Picture1.Picture = ImageBox1.Picture
PictureData As Variant - Read-only property. Provides the image data in a format that can be transferred to an Image object in MS Access. For example, the following code copies an image from a csXImage object called "ImageBox1" to a MS Access Image object called "Image1":
Image1.PictureData = ImageBox1.PictureData
1.5. Storing Images in Memory
Images can be written to and read back from an OLE variant array as binary data. This is a fast method for moving images around in an application as the image will be stored in RAM rather than written to disk. A typical use of this feature would be to save successive versions of an image in a temporary buffer for an "Undo" command.
WriteBinary (Format As TxGraphicsFormat) As Variant - Writes an image as binary data to an OLE Variant array. The graphics format is defined by Format. If Format is gfTIF or gfPDF and a multi-page TIFF or PDF has been created in memory using the AddToTIF or AddToPDF function, the prepared multi-page TIFF or PDF will be written to the OLE Variant array instead of the current image.
This method is a function and must be called by assigning to a variable. For example, in VB, the syntax would be of the form:
VariantName = WriteBinary (gfBMP)
If UseSelection is True, WriteBinary will write only the selected region of the image to the OLE Variant array.
ReadBinary2 (OLEInput As Variant) - Reads an image as binary data from OLEInput, which is an OLE Variant array. If OLEInput contains multi-page TIFF or PDF data, the image to be read is defined by the ReadImageNumber property. Data saved in PDF format cannot be read by ReadBinary2.
ReadBinary (Format As TxGraphicsFormat, OLEInput As Variant ) - This method has been superseded by ReadBinary2 which does not require the graphics format to be specified as it is automatically detected. ReadBinary only remains available to ensure compatibility with applications developed using older versions of csXImage. For new applications, ReadBinary2 should be used instead.
ImageCountBinary2 (OLEInput) As Long - Read-only property. Gives the number of images contained in the OLE Variant array OLEInput. Multiple images can only be read from variant arrays stored in TIFF or PDF format. For other formats this function will normally return the value 1.
ImageCountBinary (Format As TxGraphicsFormat, OLEInput) As Long - Read-only property. This property has been superseded by ImageCountBinary2 which does not require the graphics format to be specified as it is automatically detected. ImageCountBinary only remains available to ensure compatibility with applications developed using older versions of csXImage. For new applications, ImageCountBinary2 should be used instead.
1.6. Base64 Encoding
Images can be imported or exported using base64 encoding. Base64 was traditionally used for attaching binary data to documents such as emails. It can be used, for example, to store an image in a string field in a database.
WriteBase64 (Format As TxGraphicsFormat) As String - Returns a string containing an image in base64 encoding. The graphics format is defined by Format. If Format is gfTIF or gfPDF and a multi-page TIFF or PDF has been created in memory using the AddToTIF or AddToPDF function, the prepared multi-page TIFF or PDF will be written to the string instead of the current image.
This method is a function and must be called by assigning to a variable. For example, in VB, the syntax would be of the form:
StringName = WriteBase64 (gfBMP)
If UseSelection is True, WriteBase64 will write only the selected region of the image to string.
ReadBase64 (Base64Input As String) - Reads an image from a base64 encoded string. If Base64Input contains multi-page TIFF data, the image to be read is defined by the ReadImageNumber property. Data saved in PDF format cannot be read by ReadBase64.
1.7. Screen Capture
The whole screen, or a single window, can be captured using CaptureScreen or CaptureWindow.
CaptureScreen ( ) - Captures a full screenshot into the control. This is similar to using PrintScreen to capture a screenshot into the clipboard.
CaptureWindow (Handle As Long) - Captures an image of a window into the control. Handle is the Windows handle to the required window. This operates in a similar way to the Alt-PrintScreen Windows command which copies the active window to the clipboard, except that CaptureWindow can be used on any window.
1.8. File Drag & Drop
An image file in a supported format can be loaded into csXImage by dragging and dropping the file onto the control.
DragDropActive As Boolean - The drag and drop feature can de disabled by setting this property to False. (Default = True).
DragDropCancel ( ) - This method can be called from the OnStartDragDrop event procedure to cancel the current drag and drop operation. It has no effect if called at any other time.
DragDropFileName As String - Read-only property. When called from the OnStartDragDrop event procedure this returns the full path and name of the file being loaded. It returns an empty string if called at any other time.
1.9. Supported Graphics File Formats
csXImage supports the reading and writing of files in most popular formats commonly encountered. These formats are summarised here. Functions of the control which relate to a particular file format are also detailed in this section. Except where otherwise specified, csXImage fully supports reading and writing of files in these formats.
1.9.1. BMP (Bitmap)
BMP is the standard graphics format for Windows systems. The image is stored uncompressed and can be in either 24-bit RGB or paletted format. The palette can be either 256 colour, 16 colour or monochrome.
1.9.2. TIFF or TIF (Tagged Image File Format)
The TIFF file format is a very flexible format which allows images to be stored in many different ways.
The TIFF specification defines a set of 'baseline' requirements which allows for images to be stored as 24-bit RGB, paletted (256 or 16 colour), greyscale, or black and white.
The image can either be stored uncompressed or using the PackBits compression algorithm which is a simple run-length compression scheme. Black and white images may also be compressed using Modified Huffman Compression. Both these compression schemes are 'lossless', i.e., the image quality is not impacted by the compression.
csXImage fully supports the above 'baseline' TIFF requirements.
In addition, the following extensions of the TIFF format are supported:
- CCITT Group 3 and Group 4 fax compression schemes. These are compression algorithms for black and white images. Reading of both schemes is supported. Files can be written using Group 4 compression.
- Files stored in CMYK colour space can be read and are automatically converted to 24-bit RGB.
- Files stored using the LZW compression algorithm can be read (but see note regarding LZW patents in Section 1.9.4).
- TIFF files can contain multiple images. csXImage has the capability to read any image out of a multi-page TIFF file, to create multi-page TIFF files from individual images, or to insert images into or delete images from existing files.
- IPTC text (File Info) and Exif data can be stored in TIFF files. Support for these features is described in Section 12.
TIFF files can store data in other formats including JPEG, YCbCr and LAB formats. These are not currently supported by csXImage.
TIFF images can include ICC colour profiles. See the section on JPEG format for further information about how csXImage handles these.
The following functions are available for the reading and writing of multi-page TIFF files:
InsertTIF (Source As String, Dest As String, Page As Long) - Inserts the image as an additional page into an existing TIFF file. The existing file is read from disk, and a new file is saved with the additional image added. The new file can either overwrite the existing one, or be saved with a different name. Source must be a complete path to the existing file, Dest is a complete path to the new file to be created, and Page is the position in the TIFF file where the image will be inserted with the first image in the file being Page = 1.
Source and Dest can be identical, in which case, the existing file is replaced. If Dest is an empty string, the existing file will be replaced. If Source cannot be found, Dest will be created new with only the single image. If Page is set to zero, the image will be inserted at the end of the file.
The following VB example shows how the InsertTIF function can be used to combine 5 images, currently held in files '1.tif', '2.tif', etc., into a single multi-page file called 'multi.tif':
ImageBox1.LoadFromFile "1.tif"
ImageBox1.SaveToFile "multi.tif"
For i = 2 To 5
ImageBox1.LoadFromFile Str(i) & ".tif"
ImageBox1.InsertTIF "multi.tif", "", 0
Next i
If UseSelection is True, InsertTIF will save only the selected region of the image.
DeleteTIF (Source As String, Dest As String, First As Long, Count As Long) - Deletes a range of consecutive images from an existing TIFF file and saves the file, either overwriting the existing file, or creating a new file. Source must be a complete path to the existing file, Dest is a complete path to the new file to be created, First is the position in the TIFF file of the first image to be deleted and Count is the number of images to be deleted. For example, if First is 4 and Count is 3, the images numbered 4, 5 and 6 would be deleted.
Source and Dest can be identical, in which case, the existing file is replaced. If Dest is an empty string, the existing file will be replaced.
Multiple images can be saved to a TIFF file by building the TIFF pages in memory using the following functions:
AddToTIF (Page As Long) - Stores the image temporarily in memory as a page which is ready to be written to a TIFF file. Page is the number of the page in the TIFF file where the image will be saved. If Page is set to zero, the image will be positioned at the end of the file.
WriteTIF (FileName As String) - Saves a TIFF file to disk. The file will include all the images that have previously been stored using the AddToTIF function. FileName must be a complete path to the file.
WriteTIFDialog As Boolean - Similar to the WriteTIF command, this function saves a TIFF file to disk including all the images that have previously been stored using the AddToTIF function. A standard File Save dialogue box is displayed allowing the user to select the file path and name. The return value is True if a file is saved and False if the user clicks the Cancel button or an error occurs when saving the file.
ClearTIF ( ) - Clears all the images from memory that have been stored using AddToTIF.
TIFF file compression is handled by the Compression property.
Compression As TxCompression - Defines the compression method, if any, that will be used when the file is saved. This will only apply to certain file formats as described in the table below. If a value for Compression is specified which is invalid for the file format and/or colour depth being used, the default of no compression will be applied. When an image is loaded from a file that is already using one of these compression methods, the property will be set accordingly.
The value can be:
- cmNone - No compression (Default)
- cmPackBits - The PackBits compression algorithm will be used. PackBits is a simple byte-oriented run length encoding scheme. It is used for files saved in TIFF format. It can be applied to any colour depth but is most appropriate for images using a palette with a small number of colours (i.e., not 24-bit images).
- cmGroup4 - The CCITT Group 4 Fax compression algorithm will be used. This is a 2D modified Huffman encoding method which is used only for compression of Black and White (cfMonoBW) images in the TIFF format. It is a very efficient method which can achieve very high compression ratios on images such as scanned documents which contain a lot of white space. Note that if Group 4 compression is selected for an image that is not Black and White, the saved image will be converted to cfMonoBW before saving, but the image held by the control will be unchanged.
WasCMYK As Boolean - Read-only property. Indicates whether the current image was originally read from a file using CMYK colour format. This can apply to images read from TIFF, PSD or JPEG format files.
1.9.3. JPEG or JPG (Joint Photographic Experts Group)
The JPEG file format is probably the most common method for saving full colour images, typically photographs, when a high level of compression is required. It uses a 'lossy' compression method, which means that the image read from a saved file will not be identical to the original image before it was saved.
Repeated loading and saving of a JPEG file will result in deterioration of the quality, and should be avoided, but at the levels of compression typically used for saving photographs, the loss of quality is hardly noticeable when the file is saved once from its original.The type of compression used by JPEGs does not produce good quality images that contain sharp edges and text as these edges often become blurred on saving, even using a low compression level. The JPEGQuality property controls the amount of compression used when a JPEG is saved.
JPEG compression / quality is not a universal value and different software packages use different scales. It cannot be read directly from an image, although csXImage has a read-only property, JPEGApproxQuality, that gives an approximate value. This could be useful when reading images that have already been compressed in order to save them again with a similar level of compression. If JPEGQuality is set to a higher value than that originally used to save the image, the new image will have a larger file size without gaining any quality, and it is better to avoid this if possible.
JPEG files stored in CMYK colour space can be read by csXImage and are automatically converted to RGB. Saving of JPEG files in CMYK colour space is not currently supported.
IPTC text (File Info) and Exif data can be stored in JPEG files. Support for these features is described in Section 12.
JPEG (and TIFF) images can contain information that defines how the colours should appear when displayed. A system that is frequently used is defined by the International Color Consortium (ICC) and csXImage can preserve this information when editing JPEG images. A description of colour profiles and colour management is beyond the scope of these instructions.
The default behaviour of csXImage is to discard the colour profile on opening a JPEG or TIFF. To overrule this, set the KeepICCProfile property to True before loading the image. If the current image contains an ICC colour profile, the HasICCProfile property will be set to True. An existing profile can be removed by calling the ClearICCProfile method.
The support for ICC profiles is limited to preserving or discarding existing information. There is no functionality to read information about the profile or to edit it in any way.
The following functions specific to JPEG files are available:
JPEGQuality As Integer - When an image is saved in JPEG format (file extensions .jpg, .jpeg or .jpe), the quality can be varied between a high quality image, which gives a large file, or a lower quality image, which gives a smaller file. This property can take a value from 1 to 100. 100 is the highest quality, 1 is very low quality. (Default = 90).
ProgressiveJPEG As Boolean - If true a JPEG will be saved using progressive compression instead of baseline. This property is set when a JPEG is loaded. (Default = False).
JPEGApproxQuality As Long - Read-only property. When a JPEG is loaded, this property contains an approximate value for the compression (quality) used when the image was saved. The value is an integer in the range 0 to 100. It corresponds to the same range of values as JPEGQuality except that 0 indicates that the value is undefined.
JPEGApproxQualityError As Double - Read-only property. When a JPEG is loaded, this property contains an indication of the accuracy of the JPEGApproxQuality property. A lower value indicates a higher level of accuracy. A value of less than 1 indicates that JPEGApproxQuality is a reliable measure of the quality while a value of tens or hundreds indicates that JPEGApproxQuality is merely an approximate estimate.
JPEGHigherSpeed As Boolean - When set to True any JPEG will be loaded using a reduced colour depth. The image will load at a higher speed at the expense of some image quality. Set the property before calling LoadFromFile, ReadBinary2 or LoadFromURL. (Default = False).
KeepICCProfile As Boolean - Determines whether an embedded ICC colour profile will be stored when opening a JPEG or TIFF image. This property must be set to True to save an existing profile with a JPEG or TIFF image. (Default = False).
HasICCProfile As Boolean - Read-only property. Indicates whether the current image contains an ICC colour profile. It will only return True if KeepICCProfile has been set before loading the image.
ClearICCProfile ( ) - Clears an ICC colour profile from the current image.
1.9.4. GIF (Graphics Interchange Format)
GIF format saves files using 256 colours (8-bit colour). It can compress images with large areas of a single colour very efficiently and is commonly used in web pages for backgrounds, logos, etc. The compression is 'lossless'.
GIF images support the use of a single transparent colour. Functions related to transparency are described in Section 6.
1.9.5. PSD (Photoshop Format)
This is the standard format used by Adobe Photoshop to save images. A PSD file can contain multiple layers of an image, as well as the composite image created by combining the layers together. As csXImage only holds a single image, it simply reads the composite image and ignores the layers. A PSD file saved by csXImage will only have a composite image and no layers.
PSD files stored in CMYK colour space can be read by csXImage and are automatically converted to RGB. Saving of PSD files in CMYK colour space is not currently supported.
Reading and writing of File Info (IPTC text) in PSD files is supported.
1.9.6. PNG (Portable Network Graphics)
The PNG format provides an efficient lossless compression of image data and it uses the same compression method as zip files. It provides a wide range of colour depths, but these are not all supported for writing by csXImage, although they can be read. Supported colour depths are 24 bit, 8 bit, 4 bit and 1 bit.
PNG files support the use of transparency which can be in the form of a single transparent colour, as used in GIF files, or an "alpha channel" which describes a level of transparency for each individual pixel. csXImage can extract this information when a PNG image is loaded. If the image is saved again in PNG format, the alpha channel or transparency information will be saved as part of the image.
The alpha channel will be preserved if the image is resized, cropped, rotated or flipped. Other edits will cause the alpha channel to be discarded although the image will first be merged with the background.
A PNG image can specify a background colour. This is to be shown behind transparent pixels if a viewer is unable to show whatever is behind the image. csXImage can display the image either using this background colour, or using the colour of the form or other container behind the control. csXImage will merge a PNG containing an alpha channel with this background when the image is exported to another format, or when the alpha channel is removed due to editing as described above. If no background colour is specified, white will be used by default.
It is not possible to edit an alpha channel directly but the data can be passed to a second instance of csXImage where it can be edited, then passed back.
Properties and methods related to transparency in PNG files are described in detail in Section 6.
PNG images containing a colour palette (colour images that are 8 bit or less) can specify a variable amount of transparency for each palette entry. This information is also preserved when loading and saving, but it is removed when the image is edited, except for resize, crop, rotate and flip operations These images will not be merged with a background when exported or edited, but the transparency is used in merge functions. csXImage cannot edit this type of transparency information except for the simple case where only one colour is fully transparent.
1.9.7. PCX Format
PCX is an old format for saving images of all colour depths (RGB, paletted, greyscale or black and white). It is not commonly used today, but archived images in this format may be encountered.
1.9.8. WBMP or WBM (Wireless Bitmap)
The WBMP format is used by WAP devices. It only supports black and white images.
1.9.9. PDF (Portable Document Format)
csXImage can save images to PDF files. The images are always saved one per page, with the page size set equal to the image size.
The image export methods which support PDF are SaveToFile and PostImage.
Multiple images can be saved to a PDF file by building the PDF pages in memory using the following functions:
AddToPDF (Page As Long) - Stores the image temporarily in memory as a page which is ready to be written to a PDF file. Page is the number of the page in the PDF file where the image will be saved. If Page is set to zero, the image will be positioned at the end of the file.
WritePDF (FileName As String) - Saves a PDF file to disk. The file will include all the images that have previously been stored using the AddToPDF function. FileName must be a complete path to the file.
WritePDFDialog As Boolean - Similar to the WritePDF command, this function saves a PDF file to disk including all the images that have previously been stored using the AddToPDF function. A standard File Save dialogue box is displayed allowing the user to select the file path and name. The return value is True if a file is saved and False if the user clicks the Cancel button or an error occurs when saving the file.
ClearPDF ( ) - Clears all the images from memory that have been stored using AddToPDF.
The following VB example shows how to use the above functions. Here, five images currently held in files '1.jpg' to '5.jpg' are written to a PDF file with five pages:
ImageBox1.ClearPDF
For i = 1 To 5
ImageBox1.LoadFromFile Str(i) & ".jpg"
ImageBox1.AddToPDF (i)
Next i
ImageBox1.WritePDF "NewFile.pdf"
An image can be inserted into an existing PDF file using the InsertPDF function.
InsertPDF (Source As String, Dest As String, Page As Long) - Inserts the image as an additional page into an existing PDF file. The existing file is read from disk, and a new file is saved with the additional image added. The new file can either overwrite the existing one, or be saved with a different name. Source must be a complete path to the existing file, Dest is a complete path to the new file to be created, and Page is the position in the PDF file where the image will be inserted with the first page in the file being Page = 1.
Source and Dest can be identical, in which case, the existing file is replaced. If Dest is an empty string, the existing file will be replaced. If Source cannot be found, Dest will be created new with only the single image. If Page is set to zero, the image will be inserted at the end of the file.
The following properties allow the property tags of PDF files to be set before they are saved. They are all strings and their use is self-explanatory. All are empty strings by default.
PDFTitle As String.
PDFSubject As String.
PDFAuthor As String.
PDFKeywords As String.
PDF (Portable Document Format) is copyright of Adobe Systems Incorporated.
2. Image Properties
This section describes properties of the image currently loaded in the control.
ColorFormat As TxColorFormat - The ColorFormat property defines the depth of colour in the image. The value of ColorFormat can be changed in order to convert the image to a different format.
ColorFormat can take one of the following values:
- cf24bit - 24-bit colour, in which each pixel is represented by 3 bytes, one for the intensity of red, one for green and one for blue.
- cf256Color - 256 colour (8-bit) palettised image. A table (palette) is stored which lists the red, green and blue intensities for each available colour. Each pixel is represented by 1 byte to indicate the colour entry in the palette.
- cf256Grayscale - This image is stored in the same way as a 256 colour image, but every colour in the palette is a shade of grey, i.e., red, green and blue values are equal.
- cf16Color - 16 colour (4-bit) palettised image. A table (palette) is stored which lists the red, green and blue intensities for each available colour. Each pixel is represented by 4 bits to indicate the colour entry in the palette.
- cf16Grayscale - This image is stored in the same way as a 16 colour image, but every colour in the palette is a shade of grey, i.e., red, green and blue values are equal.
- cfMono - Monochrome (1-bit) palettised image. A table (palette) is stored which lists the red, green and blue intensities for the two available colours. Each pixel is represented by 1 bit to indicate the colour entry in the palette. Note that the two colours can be any colours, it is not necessary to use black and white. However, some commonly used image processing applications always interpret monochrome images as being black and white, and may not display the colours of a cfMono image created by csXImage correctly.
- cfMonoBW - Monochrome (1-bit) palettised image (see above) in which the two colours are pure black and pure white.
- cfNone - This is a special value for the ColorFormat property which indicates that no image is loaded into the control. It is not possible for the user to set ColorFormat equal to cfNone.
ImageHeight As Long - Read-only property. The height of the loaded image, in pixels. To change the height of an image, an appropriate method should be used, e.g., ResizeImage.
ImageWidth As Long - Read-only property. The width of the loaded image, in pixels. To change the width of an image, an appropriate method should be used, e.g., ResizeImage.
XDPI As Long - The horizontal pixel density of the image, in pixels per inch (dots per inch or DPI).
YDPI As Long - The vertical pixel density of the image, in pixels per inch (dots per inch or DPI).
XPelsPerMeter As Long - The horizontal pixel density of the image, in pixels per meter.
YPelsPerMeter As Long - The vertical pixel density of the image, in pixels per meter.
Note: The values of XDPI and XPelsPerMeter will remain consistent with each other if one is changed by the user. For example, if the user sets the value of XDPI, XPelsPerMeter will also be updated. The same applies to YDPI and YPelsPerMeter.
ImageLoaded As Boolean - Read-only property. Indicates whether an image is currently loaded into the control.
OriginalFormat As TxGraphicsFormat - Read-only property. Shows the original file format of the image when it was read either from disk using LoadFromFile or LoadDialog, from a URL using LoadFromURL, or from binary data using ReadBinary2.
PixelColor (X As Long, Y As Long) As OLE_COLOR - The colour of the pixel at co-ordinates X, Y.
ColorCount (Color As OLE_COLOR) As Long - Read-only property. The number of pixels in the image having colour exactly equal to Color.
IsBlank As Boolean - Indicates whether or not the current image is a blank white page. This property is typically used to identify separator pages when scanning multiple pages in a document feeder, the blank pages having been added to the batch to indicate where one multi-page file should end and the next begin. The sensitivity of this property can be adjusted using the BlankTol and BlankBorder properties.
BlankTol As Long - When the IsBlank property is used to detect blank scanned pages, some allowance must be made for imperfections. For example, there may be some marks on the blank pages, or specks of dust on the scanner glass that could cause some black pixels to appear in the scanned image. This property allows the tolerance to be adjusted and represents the number of non-white pixels that are permitted per 1,000,000 total pixels in the image before a page is judged not to be blank. (Default = 100).
BlankBorder As Double - The IsBlank property will ignore some pixels around the edge of the page when checking for a blank page. This allows for cases where the paper is slightly misaligned in the scanner and a black edge appears on the scanned image. This property allows the size of this border to be modified. The value is the percentage of the image height and width that will be ignored as border. For example, setting BlankBorder to 10% when scanning 8.5" x 11" paper will mean that a top and bottom margin each of 1.1" and a left and right margin each of 0.85" will be ignored by the IsBlank property. (Default = 5.0).
3. Resizing and Rotating Images
A comprehensive range of functions is available to change the size or orientation of an image. These include ResizeImage and ScaleImage for making the image either larger or smaller, Flip to create a mirror image, Rotate to turn through any given angle and Crop to remove the edges of the image.
Note that these functions all affect the actual image, not just its appearance on screen. To change the displayed image size without resizing the underlying image, use the Zoom function described in Section 9.
ResizeImage (NewWidth As Long, NewHeight As Long) - Resizes the loaded image to the sizes given in NewWidth and NewHeight. The sizes are in pixels. If either NewWidth or NewHeight are set to zero, this value will be ignored, and the image will be resized using the other given measurement, and maintaining the current aspect ratio.
ScaleImage (ScalePercent As Single) - Resizes the loaded image, keeping the same aspect ratio. The image is scaled by a percentage value, ScalePercent. For example, if ScalePercent = 50, the image is reduced to half size.
If ResizeImage or ScaleImage are used with the Resample property set to True, the image will be automatically converted to a ColorFormat of cf24bit.
ResizeFit (MaxWidth As Long, MaxHeight As Long) As Boolean - Resizes the image, keeping the same aspect ratio, to fit within the dimensions MaxWidth and MaxHeight. This only reduces the size of images that are too large to fit, it does not increase the size of small images. ResizeFit is a boolean function which returns the value True if the image was resized.
AutoScale ( ) As Boolean - Resizes the image, keeping the same aspect ratio, to fit within the width and height of the control. This only reduces the size of images that are too large to be displayed, it does not increase the size of small images. AutoScale is a boolean function which returns the value True if the image was resized.
Flip (FlipMode As TxFlipMode) - Flips the loaded image in either the horizontal or vertical plane (produces mirror image).
FlipMode can be either:
- fmHoriz : Flips in horizontal plane
- fmVert: Flips in vertical plane
Rotate (Angle As Double) - Rotates the image counter-clockwise. The amount of rotation in degrees is specified by Angle.
When an image is rotated by an angle that is not a multiple of 90 degrees, there will be an area around the image that must be filled with colour. The colour specified in the BGColor property is used.
When an image is rotated by an angle that is not a multiple of 90 degrees, and the image hasColorFormat of cf24bit, and the Resample property is set to True, an antialiasing technique is used to improve the quality of the rotated image.
Crop (X1 As Long, Y1 As Long, X2 As Long, Y2 As Long) - Crops the image to a rectangle bounded by the points (X1, Y1) and (X2, Y2). If any of the specified co-ordinates are outside the current image (i.e., negative or greater than the image width or height) blank space filled with colour BGColor is added to the outside of the image.
CropToSelection ( ) - Crops the image to a rectangle containing the selected region (see Section 10). If the selected region is non-rectangular, empty pixels are filled with the background colour BGColor.
AutoCrop ( ) - Crops the image to a rectangle, removing an outer border that is lighter or darker in colour than the rest of the image. The border is automatically detected. The property DetectBorderWhite should be set to determine whether a light or dark border is searched for. AutoCrop is equivalent to calling the DetectBorder command followed by CropToSelection.
DetectBorder ( ) As Boolean - Selects a rectangular area of the image, excluding a border that is lighter or darker in colour than the rest of the image. The property DetectBorderWhite should be set to determine whether a light or dark border is searched for. The return value is True if the detection is successful.
DetectBorderWhite As Boolean - If True, AutoCrop and DetectBorder search for a border that is whiter (or lighter) than the rest of the image. Set to False to search for a blacker (or darker) border. (Default = True).
Resample As Boolean - If set to True, this determines that an antialiasing technique is used to improve image quality of rotated, resized, scaled or zoomed images. (Default = False).
FilterType As Long - Determines the filter used when the image is resampled during a ResizeImage or ScaleImage operation (but not for Rotate which uses a different filter). Filters are 1 - Bilinear, 2 - Hermite, 3 - Bell, 4 - B-Spline, 5 - Lanczos, 6 - Mitchell. (Default = 1).
4. Modifying and Enhancing the Image
This section describes the functions that are available to change the appearance of an image.
Brightness (Value As Long, DoRed As Boolean, DoGreen As Boolean, DoBlue As Boolean) - Adjusts the brightness of the loaded image. Value must be an integer between 0 (minimum) and 100 (maximum).
- 0 will reduce brightness to the maximum extent
- 100 will increase brightness to the maximum extent
- 50 gives no change
DoRed, DoGreen, DoBlue, are boolean values indicating which of the three colours are adjusted. For normal brightness adjustment, set all three parameters to True.
If the image is in a grayscale format, i.e., it has ColorFormat of cfMonoBW, cf16Grayscale or cf256Grayscale, the values entered for DoRed, DoGreen and DoBlue are ignored. In this case, these parameters will default to True.
If UseSelection is True and the ColorFormat is cf24bit, the brightness is only adjusted in the selected region of the image.
Contrast (Value As Long, DoRed As Boolean, DoGreen As Boolean, DoBlue As Boolean) - Adjusts the contrast of the loaded image. Value must be an integer between 0 (minimum) and 100 (maximum).
- 0 will reduce contrast to the maximum extent.
- 100 will increase contrast to the maximum extent.
- 50 gives no change.
DoRed, DoGreen, DoBlue, are boolean values indicating which of the three colours are adjusted. For normal contrast adjustment, set all three parameters to True;.
If the image is in a grayscale format, i.e., it has ColorFormat of cfMonoBW, cf16Grayscale or cf256Grayscale, the values entered for DoRed, DoGreen and DoBlue are ignored. In this case, these parameters will default to True.
If UseSelection is True and the ColorFormat is cf24bit, the contrast is only adjusted in the selected region of the image.
Sharpen ( ) - Sharpens the loaded image. This method requires no parameters.
Sharpen is exactly equivalent to the command SharpenBy (5).
SharpenBy (Value As Long) - Sharpens the loaded image. Value is an integer between 1 and 10 to specify the amount of sharpening. 1 gives a small sharpening effect, 10 gives a large effect.
Blur ( ) - Blurs the loaded image. This method requires no parameters.
Blur is exactly equivalent to the command BlurBy (5).
BlurBy (Value As Long) - Blurs the loaded image. Value is an integer between 1 and 10 to specify the amount of blurring. 1 gives a small blurring effect, 10 gives a large effect.
If UseSelection is True, Sharpen, SharpenBy, Blur and BlurBy only affect the selected region of the image.
ReduceRedEye ( ) - Reduces the red intensity for pixels in which the red intensity is significantly higher than the blue and green intensity. This method is intended for use on images where flash photography has resulted in a "red-eye" effect on the subject. It should be used in conjunction with selection of a region of the image, usually by using the SelectEllipse method to select the affected area of the eye. This method only operates on 24-bit images.
Invert ( ) - Converts the image to its negative by changing the colour of each pixel to the opposite colour, i.e., black is changed to white, white to black, etc.
Despeckle ( ) - Removes small marks, or specks, from an image. Small groups of pixels that are completely surrounded by pixels of another continuous colour are converted to that continuous colour.
DespeckleTol As Long - The maximum size of a group of pixels that will be removed using the Despeckle method. Valid values for DespeckleTol are in the range 1 to 9. A value of 1 means that only single pixel specks will be removed. With a value of 9, a group of pixels up to 3 pixels across and 3 pixels down will be removed. It is normally appropriate to leave this property at the default value, but on low resolution images a smaller value may be appropriate to prevent the Despeckle method removing punctuation marks or the dot on the letter 'i' from text. (Default = 9).
HLSAdjust (Hue As Double, Lightness As Double, Saturation As Double) - This can adjust one or more of the components in HLS colour space. The parameters are numbers between -100 and +100, where 0 is no change. Hue is measured on a circular scale and an adjustment of 100% in either direction brings it back to the starting point. Adjusting Lightness or Saturation by -100% will set them to zero while adjusting by +100% will double the existing value.
Example:
ImageBox1.HLSAdjust 0, 0, 30
This would increase the colour saturation of the image by 30%, leaving the hue and lightness unchanged.
Deskew ( ) - Straightens a misaligned image. This can be applied to any image, but is primarily intended for use with pages of horizontal text that have been scanned with the paper slightly misaligned in the scanner.
DeskewAngle As Double - Read-only property. Calculates and returns the angle in degrees that the image would need to be rotated by in order to straighten the image. This allows the angle to be found without actually doing the rotation as is done by the Deskew method.
DeskewMaxAngle As Long - The maximum angle of rotation that will be considered by the Deskew method or the DeskewAngle property. In calculating the angle required to deskew an image, angles in the range DeskewMaxAngle degrees to +DeskewMaxAngle degrees are evaluated. If a wider range is considered, the calculation takes more time. The default value is sufficient for deskewing most misaligned scanned pages and could in most cases be reduced to speed up the processing of large images. (Default = 15).
CombineColors (Color As OLE_COLOR, DeltaRed As Long, DeltaGreen As Long, DeltaBlue As Long) - This converts similar colours in a range to a single colour. The new colour is defined by Color with allowed difference in the RGB components of the colour being defined by DeltaRed, DeltaGreen and DeltaBlue, which are all integers in the range 0 to 255.
A typical use of this function would be to set a single colour background to have identical colour values for each pixel so that the background can be filled with a new colour or made transparent for merging with another image.
ColorReplace (OldColor As OLE_COLOR, NewColor As OLE_COLOR) - This replaces any pixels coloured OldColor and changes them to NewColor. This command applies to 24 bit coloured images only. For other images use PaletteEntry to edit the colour palette.
The following functions are for working with the colour palettes of palettised images.
PaletteEntry (Index As Long) As OLE_COLOR - The colour used by entry Index in the colour palette for the current image. If this property is read for a 24-bit colour image or with a value of Index that is outside the valid range for the current image, a zero value, equivalent to the colour black, will be returned.
Changing a palette entry will change the colour of all the pixels in the image that use that palette entry.
PaletteSize As Long - Read-only property. Returns the number of palette entries. This depends on the value of the ColorFormat property. For cf256Color and cf256Grayscale, the value is 256. For cf16Color and cf16Grayscale, the value is 16. For cfMono and cfMonoBW, the value is 2. For cf24bit, the value zero is returned.
ColorIndex (Color As OLE_COLOR) As Long - Returns the first index used by Color. If the colour is not present in the palette the return value is -1.
FindUnusedColor ( ) As Long - Returns the index of the first entry in the palette that is not used by any pixels. The return value is -1 if all the palette entries are used by pixels or if the image is 24 bit.
The following functions convert between RGB and HLS colour space values.
RGBToHue (Color As OLE_COLOR) As Double - This takes an RGB colour value and returns the equivalent hue as a value between 0 and 360.
RGBToLightness (Color As OLE_COLOR) As Double - This takes an RGB colour value and returns the equivalent lightness as a value between 0 and 1.
RGBToSaturation (Color As OLE_COLOR) As Double - This takes an RGB colour value and returns the equivalent saturation as a value between 0 and 1.
HLSToRGB (Hue As Double, Lightness As Double, Saturation As Double) As OLE_COLOR - This takes three H, L, S, parameters and returns the equivalent RGB colour value. Hue is a number between 0 and 360. Lightness and Saturation are numbers between 0 and 1.
5. Merging Images and Watermarking
These functions are used for merging two images together. A wide range of options is provided allowing many different effects. The images can be simply merged with one smaller image copied over the top of a larger image, or a watermark effect can be obtained by using transparency in one of the images.
One image must be loaded into the control to start with. The second image can be read from a number of different sources including a file on disk, a variant array held in memory, or a bitmap handle. The following three functions cover each of these three options.
MergeFile (MergeImageFile As String) - Merges a second image with the current loaded image. The two images can have different sizes and different colour formats. The resulting image retains the size and colour format of the current image.
MergeImageFile is a String that must contain a complete path to the file containing the second image.
MergeBinary (Format As TxGraphicsFormat, MergeImageBin As OLEVariant) - This is identical to the MergeFile method, except that the second image is read from a variant array instead of from a file on disk.
MergeImageBin is the name of the variant array. Format defines the graphics format used in the variant array.
MergeHandle (Handle As Long) - This is identical to the MergeFile method, except that the second image is referenced by a handle to a bitmap. For example, this could be an image currently displayed in another control.
Handle is a handle to a bitmap.
When MergeHandle is used to merge with an image from either the Image property of a VB PictureBox, or another instance of csXImage, the ReleaseBMPHandle property should be set to False.
The following properties can be set to modify the behaviour of the MergeFile, MergeBinary and MergeHandle methods. Note that if the second (watermark) image is a GIF or PNG including transparency information, this information will be used in merging the images instead of the MergeTransparent, MergeTransparentColor and MergeTransparency properties.
MergeTransparent As Boolean - If MergeTransparent is True, one colour in the second image will be ignored in the merge process, i.e., it will be treated as if it is transparent. This can typically be used where the second image contains text or an image on a white background, and the background is to be treated as transparent (Default = False).
MergeTransparentColor As OLE_COLOR - Specifies the colour that is to be treated as transparent if MergeTransparent is True. (Default = White, &H00FFFFFF).
MergeTransparency As Double - A value between 0 and 100 indicating the percent overall transparency of the second (watermark) image. A value of 100 means that the watermark is 100% transparent and the main image will be unchanged. A value of 0 means that the watermark is opaque and will completely overstamp the main image. (Default = 0).
MergeLeft As Long - The distance in pixels between the left side of the main image and the left side of the second image. Used when MergeStyle is wmSingle only. (Default = 0).
MergeTop As Long - The distance in pixels between the top of the main image and the top of the second image. Used when MergeStyle is wmSingle only. (Default = 0).
MergeReverse As Boolean - Normally, the currently loaded image is the main (background) image and the second image is merged as a watermark. If MergeReverse is set to True, the images are reversed, i.e., the current image is used as the second (watermark) image, and the second image becomes the main image. The size and colour format is then taken from the second image. (Default = False).
MergeStyle As TxWMStyle - MergeStyle provides several options for the way that the merge will be implemented. The options are:
- wmSingle : (Default). A single copy of the second image is applied, positioned at MergeLeft, MergeTop.
- wmCentre : A single copy of the second image is applied, in the centre of the main image.
- wmTile : The second image is applied at the top left of the main image and repeated across the whole of the main image.
- wmWrap : The second image is applied first at the top left of the main image, then repeated to cover the whole image. Where the second image is incomplete at the right hand side of the image, it is "wrapped", i.e., starts on the next line at the point it had finished on the previous line.
6. Transparency
Images saved in GIF or PNG format can include transparency information. Transparency can be one of three types:
- Single colour transparency (GIF or PNG). A single entry in the palette is the transparent colour. Pixels of this colour are fully transparent.
- Alpha channel (PNG only). Each individual pixel has its own level of transparency.
- Palette transparency (PNG only). This is another type of alpha channel in which each palette entry has an associated level of transparency.
When an image is loaded into csXImage, transparency information is available and is preserved when the image is saved. Alpha channel information is preserved when an image is resized, cropped, rotated or flipped. Other edits cause the alpha channel to be discarded although the image will first be merged with the background.
The following functions relate to single colour transparency:
Transparent As Boolean - Indicates that an image includes transparency information. This is only used by images to be saved in GIF or PNG formats. (Default = False).
TransparentColor As OLE_COLOR - The background, or transparent colour to be used in images with transparency. This is used by images to be saved in GIF or PNG formats. This colour is also used to fill in the background of rotated images using the Rotate method. (Default = White, &H00FFFFFF).
Note: this property was called BGColor in versions of csXImage before version 3.3. BGColor can still be used to ensure upward compatibility of applications.
The following functions are related to alpha transparency or palette transparency:
HasAlpha As Boolean - Read-only property. This indicates whether the currently loaded image contains an alpha channel.
BackgroundColor As OLE_COLOR - The colour of the background that will be shown behind transparent pixels when an image containing an alpha channel is exported. (Default = White, &H00FFFFFF).
HasBackground As Boolean - This determines whether the current image contains a background colour which will be stored when the image is exported in PNG format. (Default = False).
AlphaDisplayBackground As Boolean - csXImage will normally attempt to display an image with an alpha channel by merging transparent pixels with the background colour of the form or other container of the control. Backgrounds that are not plain, e.g., images, patterns or text, will not be merged. By setting this property to True, the BackgroundColor property will be used instead. (Default = False).
ExtraAlphaValue As Long - When an image containing an alpha channel is rotated by an angle that is not a multiple of 90 degrees, or cropped to co-ordinates that make the image bigger, the new area created will have an alpha value specified by this property. The value must be in the range 0 to 255 where 0 is fully transparent and 255 is fully opaque. (Default = 0).
ClearAlpha ( ) - This removes any alpha channel from the current image without merging it with the background.
CombineAlphaWithBG ( ) - This combines the image with the background colour, if it contains an alpha channel. The alpha channel is then removed.
NewAlpha (Value As Long) - This creates an alpha channel for the current image and sets the value for each pixel to Value, which must be an integer between 0 and 255. 0 means fully transparent and 255 means fully opaque. The ColorFormat of the image will be converted to cf24bit if it is not already.
AlphaPixel (X As Long, Y As Long) As Long - The alpha value of the pixel at co-ordinates X, Y. If the image has no alpha channel, or the values of X or Y are invalid, this will return the value -1.
AlphaText (X As Long, Y As Long TextString As String) - This method is similar to DrawText, but is used for writing antialiased text onto an image with an alpha channel. The alpha channel is preserved. It writes the text contained in TextString onto the image, starting at the point (X, Y).
TransparentPalette As Boolean - When True, the image contains a partially transparent palette. At the time of writing only PNG images support this. Setting TransparentPalette to True automatically sets Transparent to False and setting Transparent to True sets TransparentPalette to False. (Default = False).
TransparentArray (Index As Long) As Long - The values for palette transparency are stored in a zero based array where 0 is fully transparent and 255 is fully opaque. The first entry in TransparentArray corresponds to the first palette colour and the second to the second palette colour, and so on. csXImage stores values with Index from 0 to 255, although 1 bit and 4 bit images will not use all of them.
PaletteToAlpha ( ) - This method will convert a paletted image with transparency to a 24 bit colour image with an alpha channel. It can be used with single colour transparency and variable palette transparency. It will have no effect if Transparent and TransparentPalette are both False or if the colour depth is 24 bit.
The alpha channel can be edited by extracting it as a separate greyscale image and importing this into another instance of csXImage. This can be done either through a file saved to disk using SaveAlphaAsBMP and LoadAlphaAsBMP, or by passing the handle of the alpha channel using AlphaHDC.
SaveAlphaAsBMP (FileName As String) - If the current image contains an alpha channel this will save it as a greyscale bitmap. Full transparency is shown as black and full opacity is shown as white. FileName is the physical path to the saved file and it should have the extension .bmp.
LoadAlphaAsBMP (FileName As String) - This will load an alpha channel into the current image where FileName is the physical path to a greyscale bitmap file. This bitmap must be exactly the same width and height as the current image.
AlphaHDC As Long - Returns a Windows handle to a greyscale bitmap corresponding to the alpha channel. This works in a similar way to the BMPHandle property and is compatible with it. It can be used to pass an alpha channel between instances of csXImage so the data can be edited using the full range of component methods and properties. When importing an alpha channel with AlphaHDC, the imported image must have exactly the same dimensions as the current image.
Loading an image with palette transparency will set TransparentPalette and populate TransparentArray. A new image will default to TransparentArray containing all values of 255 and TransparentPalette will be False.
7. Drawing
A number of simple methods and properties are provided to enable drawing of lines, basic shapes and text on the image.
7.1. Pen and Brush Properties
The appearance of all objects drawn on the image is determined by Pen and Brush properties. Lines and the perimeters of shapes are drawn by the Pen. Shapes are filled by the Brush. Text is drawn by the Pen on a background filled by the Brush.
PenColor As OLE_COLOR - The colour of the Pen which will be used for drawing lines or the perimeters of shapes. (Default = Black, &H00000000).
PenMode As TxPenMode - Defines the way that the Pen will draw. Possible values are:
- pmBlack : Always black
- pmWhite : Always white
- pmNop : Unchanged
- pmNot : Inverse of image background colour
- pmCopy : (Default) Pen colour specified in PenColor property
- pmNotCopy : Inverse of pen colour
- pmMergePenNot : Combination of pen colour and inverse of image background
- pmMaskPenNot : Combination of colours common to both pen and inverse of image background
- pmMergeNotPen : Combination of image background colour and inverse of pen colour
- pmMaskNotPen : Combination of colours common to both image background and inverse of pen
- pmMerge : Combination of pen colour and image background colour
- pmNotMerge : Inverse of pmMerge : combination of pen colour and image background colour
- pmMask : Combination of colours common to both pen and image background
- pmNotMask : Inverse of pmMask : combination of colours common to both pen and image background
- pmXor : Combination of colours in either pen or image background, but not both
- pmNotXor : Inverse of pmXor : combination of colours in either pen or image background, but not both
PenStyle As TxPenStyle - Defines the style in which the Pen draws lines. Possible values are:
- psSolid : (Default) A solid line
- psDash : A line made up of a series of dashes
- psDot : A line made up of a series of dots
- psDashDot : A line made up of alternating dashes and dots
- psDashDotDot : A line made up of a series of dash-dot-dot combinations
- psClear : No line is drawn (used to omit the line around shapes that draw an outline using the current pen)
Note: Dotted or dashed pen styles are only available when the PenWidth property is 1.
PenWidth As Long - Defines the maximum width of the Pen in pixels. (Default = 1).
BrushColor As OLE_COLOR - The colour of the Brush which will be used for filling shapes. (Default = White, &H00FFFFFF).
BrushStyle As TxBrushStyle - Defines the pattern for the Brush. Possible values are:
- bsSolid : (Default) Fills the shape with BrushColor
- bsClear : No fill
- bsBDiagonal : Diagonal lines sloping bottom-left to top-right
- bsFDiagonal : Diagonal lines sloping top-left to bottom-right
- bsCross : Cross-hatching with vertical and horizontal lines
- bsDiagCross : Cross-hatching with diagonal lines
- bsHorizontal : Horizontal lines
- bsVertical : Vertical lines
Antialias As Boolean - If Antialias is True, any text, lines or shapes drawn will be antialiased. The appearance will be controlled by the current value of the FilterType property and setting this to 3 or 4 will give a smoother appearance. Drawing an antialiased feature will automatically convert the image to a 24 bit colour depth (ColorFormat = cf24bit). (Default = False).
7.2. Drawing Lines
DrawLine (X1 As Long, Y1 As Long, X2 As Long, Y2 As Long) - Draws a straight line from X1, Y1 up to but not including X2, Y2 using the current Pen settings.
7.3. Drawing Shapes
Rectangle (X1 As Long, Y1 As Long, X2 As Long, Y2 As Long) - Draws a rectangle using the current Pen settings and filled using the current Brush settings. The rectangle is bounded by the points (X1, Y1) and (X2, Y2).
Ellipse (X1 As Long, Y1 As Long, X2 As Long, Y2 As Long) - Draws an ellipse using the current Pen settings and filled using the current Brush settings. The ellipse is bounded by the rectangle defined by the points (X1, Y1) and (X2, Y2).
CircleCR (X As Long, Y As Long, R As Long) - Draws a circle using the current Pen settings and filled using the current Brush settings. The centre of the circle is at X, Y and the radius is R.
Circle3XY (X1 As Long, Y1 As Long, X2 As Long, Y2 As Long, X3 As Long, Y3 As Long) - Draws a circle using the current Pen settings and filled using the current Brush settings. The perimeter of the circle passes through the points (X1, Y1), (X2, Y2) and (X3, Y3).
RoundRect (X1 As Long, Y1 As Long, X2 As Long, Y2 As Long, X3 As Long, Y3 As Long) - Draws a rectangle with rounded corners using the current Pen settings and filled using the current Brush settings. The rectangle is bounded by the points (X1, Y1) and (X2, Y2). The curve of the rounded corners matches the curvature of an ellipse with width X3 and height Y3.
Pie (X1 As Long, Y1 As Long, X2 As Long, Y2 As Long, X3 As Long, Y3 As Long, X4 As Long, Y4 As Long) - Draws a pie shaped section of an ellipse using the current Pen settings and filled using the current Brush settings. The ellipse is formed from a rectangle bounded by the points (X1, Y1) and (X2, Y2). The sides of the pie are defined by the intersections between the centre of the ellipse and the points (X3, Y3) and (X4, Y4).
Arc (X1 As Long, Y1 As Long, X2 As Long, Y2 As Long, X3 As Long, Y3 As Long, X4 As Long, Y4 As Long) - Draws an arc. The arc traverses the perimeter of an ellipse that is bounded by the points (X1, Y1) and (X2, Y2). The arc is drawn following the perimeter of the ellipse, counter-clockwise, from the starting point to the ending point. The starting point is defined by the intersection of the ellipse and a line defined by the centre of the ellipse and (X3, Y3). The ending point is defined by the intersection of the ellipse and a line defined by the centre of the ellipse and (X4, Y4).
Arc3XY (X1 As Long, Y1 As Long, X2 As Long, Y2 As Long, X3 As Long, Y3 As Long) - Draws an arc. The arc traverses the perimeter of a circle from (X1, Y1) to (X3, Y3) passing through (X2, Y2).
Chord (X1 As Long, Y1 As Long, X2 As Long, Y2 As Long, X3 As Long, Y3 As Long, X4 As Long, Y4 As Long) - Draws a shape that is defined by an arc and a line that joins the endpoints of the arc. The chord consists of a portion of an ellipse that is bounded by the points (X1, Y1) and (X2, Y2). The ellipse is bisected by a line that runs between the points (X3, Y3) and (X4, Y4).
The perimeter of the chord runs counter-clockwise from (X3, Y3), along the ellipse to (X4, Y4), and straight back to (X3, Y3). If (X3, Y3) and (X4, Y4) are not on the surface of the ellipse, the corresponding corners on the chord are the closest points on the perimeter that intersect the line.
PointAdd (X As Long, Y As Long) - Adds a point to be used as a vertex when drawing a polygon. See Polygon for an explanation of how to use this method.
Polygon ( ) - Draws a polygon. The polygon will be constructed by joining a series of points which act as vertices of the polygon. To use this method, first call PointAdd several times to define the vertices as points, then call Polygon to complete the drawing. After calling Polygon the list of points is automatically cleared in readiness for drawing another polygon.
BezierPointAdd (X As Long, Y As Long) - Adds a point to be used by the PolyBezier method.
PolyBezier ( ) - Draws a set of cubic Bezier curves using the points added by BezierPointAdd. The first curve is drawn from the first point to the fourth point, using the second and third points as control points. Each subsequent curve in the sequence needs exactly three more points. The ending point of the previous curve is used as the starting point, the next two points in the sequence are control points and the third is the ending point. The current Pen settings are used. The points stored by BezierPointAdd are cleared after calling PolyBezier.
FloodFill (X As Long, Y As Long) - Fills a region of the image with BrushColor. The fill starts at co-ordinates X, Y and moves outwards until a boundary is reached. The boundary is defined by FloodFillColor and FloodFillStyle. FloodFillStyle can be fsBorder, in which case, the fill continues to a boundary of pixels of FloodFillColor, or can be fsSurface, in which case pixels of FloodFillColor are filled.
FloodFillColor As OLE_COLOR - The colour that defines the boundary of the FloodFill method. (Default = Black, &H00000000).
FloodFillStyle As TxFloodFillStyle - Defines the behaviour of the FloodFill method. Possible values are:
- fsSurface : (Default). A region including only pixels of colour FloodFillColor and bounded by other colours is filled.
- fsBorder : A region bounded by pixels of colour FloodFillColor is filled.
7.4. Drawing Text
DrawText (X As Long, Y As Long, TextString As String) - Writes the text contained in TextString onto the image, starting at the point (X, Y) and using the font defined by property TextFont. The text can be written at an angle specified in the property TextAngle. The colour of the text is PenColor and the colour of the background to the text is BrushColor. The property TextTransparent can be set to True to give a transparent background. The text will be left or right justified, or centred, depending on the value of TextJustify. Note that the value of X will define the left side of the text for left-justification, the right side for right-justification, and the centre for centred text.
TextString is actually an OLE BSTR data type, which is a string of double-byte characters. It fully supports the use of Unicode characters. For Unicode to display correctly, TextFont must be set to a suitable font which contains the necessary characters and is installed on the system.
The control characters Carriage Return (CR - ASCII character 13) and Line Feed (LF - ASCII character 10) can be included as many times as required in TextString in order for the text to be printed on multiple lines. Blank lines can be inserted in a block of text by using two or more CR characters consecutively.
If the Antialias property is set to True the text will be drawn antialiased to give it a smoother appearance.
TextFont As IFontDisp - Defines the font to be used for the DrawText method. The TextFont property can be changed by referring to various sub-properties, e.g., Bold, Italic, Name, etc. For example, the following VB code sets the TextFont property of ImageBox1 to Arial 12 (Bold):
ImageBox1.TextFont.Name = "Arial"
ImageBox1.TextFont.Size = 12
ImageBox1.TextFont.Bold = True
Some programming environments do not support the TextFont property, so as an alternative, the following four properties can access some of the font sub-properties directly.
TextFontName As String - Equivalent to TextFont.Name.
TextFontSize As Long - Equivalent to TextFont.Size.
TextFontBold As Boolean - Equivalent to TextFont.Bold.
TextFontItalic As Boolean - Equivalent to TextFont.Italic.
TextAngle As Single - The angle in degrees, measures counter-clockwise from the horizontal, of text written by the DrawText method. (Default = 0).
TextTransparent As Boolean - If TextTransparent is True, text written by the DrawText method will have a transparent background. (Default = False).
TextTransparency As Long - Text can be made partially transparent by setting this property which defines the amount of transparency for text written by the DrawText method. The value is in percent and must be an integer from 0 to 100. 0 means the text is fully opaque and 100 means it is invisible. Setting it to a high value makes the text appear as a watermark. The image must be 24 bit colour for this property to have any effect. (Default = 0).
TextWidth (TextString As String) As Long - Read-only property. Returns the width, in pixels, that will be used if the string TextString is written onto the image using the DrawText method.
TextHeight (TextString As String) As Long - Read-only property. Returns the height, in pixels, that will be used if the string TextString is written onto the image using the DrawText method.
TextJustify As TxTextJustify - Defines the text justification (alignment) that will be used by the DrawText method. Possible values are:
- tjLeft: (Default). Left justified text.
- tjCenter: Centred text.
- tjRight: Right justified text.
8. Interacting with Hardware (Printers, Scanners and Cameras)
8.1. Printers
Functions are provided in csXImage to enable printing, either through a print dialogue, which includes a print preview, or by sending images directly to a printer, controlled by a number of properties.
In both cases the printing is started by PrintImage, with UsePrintDialog determining the mode of operation.
If it is desired to write an application with a customised print dialogue, then normal print functions can be used from most programming environments, independent of the functions described here.
PrintImage As Long - Read-only property. Starts printing, either through a dialogue, or immediately, depending on the value of the boolean property UsePrintDialog. The return value indicates the result of the printing as follows:
- 0: No image available for printing
- 1: Image was printed
- 2: User clicked the Cancel button in the dialogue
UsePrintDialog As Boolean - If set to True, a dialogue is displayed when PrintImage is called. This dialogue allows selection of printer and adjustment of various print properties. It also provides a print preview. If set to False, the image prints immediately when PrintImage is called. (Default = True).
The dialogue can be customised for use in other languages. See the explanation of properties PDS_Title etc. at the end of this section.
PrinterIndex As Long - The index number of the selected printer. Setting this property to -1 selects the default printer. (Default = -1).
PrintPaperSize As Long - An integer value indicating the paper size to be used for printing. These values are defined by the Windows operating system and there are a large number of possible values (approximately 100). All possible values are supported, but only the most common paper sizes are listed below for reference:
- 0: (Default) The default paper size for the specific printer
- 1: Letter 8.5" x 11"
- 3: Tabloid 11" x 17"
- 5: Legal 8.5" x 14"
- 6: Statement 5.5" x 8.5"
- 7: Executive 7.25" x 10.5"
- 8: A3 297mm x 420mm
- 9: A4 210mm x 297mm
- 11: A5 148mm x 210mm
PrintUnits As TxPrintUnits - The units of measurement to be used for the properties PrintLeft & PrintTop which determine the position of the printed image. Possible values are:
- pucm: (Default) Centimetres (cm)
- puInch: Inches (in)
PrintLeft As Double - The distance from the left side of the page to the left side of the image, in units specified by PrintUnits. Note that this property is not used if PrintFit or PrintCentre are set to True. (Default = 0).
PrintTop As Double - The distance from the top of the page to the top of the image, in units specified by PrintUnits. Note that this property is not used if PrintFit or PrintCentre are set to True. (Default = 0).
PrintCopies As Long - The number of copies to be printed. (Default = 1).
PrintScale As Double - The scaling factor of the printed image. The normal size of a printed image is determined by the size of the image in pixels and the resolution of the image in pixels per inch, or per meter (see properties XDPI etc.). If PrintScale is set to a value different from 100%, the image size will be adjusted accordingly. Note that this property is not used if PrintFit is set to True. (Default = 100).
PrintOrientation As TxPrinterOrientation - The orientation of the printed image. Possible values are:
- poPortrait: (Default) Portrait
- poLandscape: Landscape
PrintPaperSource As Long - An integer value indicating the paper source or tray to be used for printing. These values are defined by the Windows operating system and there are more possible values than listed here. All possible values are supported, the following being the more commonly used ones:
- 0: (Default) Default tray
- 1: The first, only or upper paper tray
- 2: Lower
- 3: Middle
- 4: Manual
- 5: Envelope
PrintFit As Boolean - If set to True, the size of the printed image is adjusted to fit the page. (Default = False).
PrintCentre As Boolean - If set to True, the printed image is positioned at the centre of the page. (Default = False).
PrintTitle As String - The document title that will be displayed in the printer manager when printing. (Default = 'Chestysoft csXImage').
PrinterCount As Long - Read-only property. The number of installed printers.
PrinterName (Index As Long) As String - Read-only property. The name of the printer referenced by Index.
SelectPrinterByName (Name As String) As Boolean - Sets PrinterIndex to the printer given by Name. The return value is True if a printer matching Name is found and selected.
The dialogue displayed when UsePrintDialog is set to True can be customised for use in languages other than English. All the text strings used for buttons, checkboxes etc. can be set to a different value using the following string properties prefixed with 'PDS_' (Print Dialogue String).
Note the possibility to include an ampersand (&) in some of the strings, e.g., PDS_Portrait, to indicate a short-cut key.
PDS_Title - The title at the top of the dialogue. (Default = 'Print Preview').
PDS_Printer - The label for the list of printers. (Default = 'Printer:').
PDS_Paper - The label for the list of paper sizes. (Default = 'Paper Size:').
PDS_Orientation - The text in the group/frame for selecting orientation. (Default = 'Orientation').
PDS_Portrait - The text for the option button for selecting portrait. (Default = 'P&ortrait').
PDS_Landscape - The text for the option button for selecting landscape. (Default = '&Landscape').
PDS_PaperDefault - The first entry in the list of paper sizes, indicating that the default paper size for the selected printer will be used. (Default = '(Printer Default)').
PDS_Position - The text in the group/frame for defining position. (Default = 'Position').
PDS_Left - The label for the left position. (Default = 'Left:').
PDS_Top - The label for the top position. (Default = 'Top:').
PDS_Units - The label for the measurement units. (Default = 'Units:').
PDS_Copies - The label for the number of copies. (Default = 'Copies:').
PDS_Scale - The label for the scale. (Default = 'Scale:').
PDS_Fit - The text on the checkbox for fitting to a page. (Default = '&Fit to Page').
PDS_Centre - The text on the checkbox for centring on a page. (Default = 'C&entre on Page').
PDS_Print - The text on the print button. (Default = '&Print').
PDS_Cancel - The text on the cancel button. (Default = '&Cancel').
8.2. Scanners and Cameras (TWAIN)
Images can be imported from a TWAIN compliant device such as a scanner or a webcam.
There are three steps involved in acquiring an image and the functions associated with each step are described in turn. The steps are:
- Selecting the TWAIN device to be used.
- Configuring the settings of the device, e.g. resolution.
- Acquiring the image.
8.2.1. Information about TWAIN
TWAIN is an industry standard for communication between software applications and devices for image acquisition. It was first developed in the early 1990s, but has been regularly updated since. The latest version number of the TWAIN specification is 2.3 and this was released in 2013.
csXImage is fully compatible with version 2.3 of the specification.
Overview
Communication in an application that uses csXImage can be summarised by the diagram below.
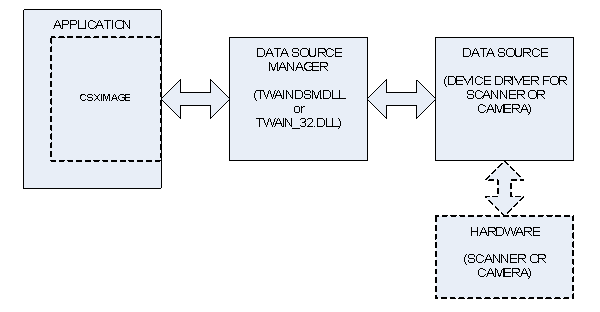
TWAIN defines the communication between three elements. The first element is the Application. This refers to the software you will create using csXImage as a component. The second element is the Data Source Manager (DSM). This is a dynamic link library that exists on all systems where TWAIN is to be used. All communication goes through the DSM. The third element is the Source. If an image is being acquired from hardware such as a scanner, the Source is the device driver for the hardware. Only the device driver communicates directly with the hardware.
All communication follows the arrows shown on the diagram. So if the Application requests that an image is scanned, this request is first sent to the Data Source Manager, which relays the request to the Source. The Source controls the scanner to scan the image, then sends the image back to the Application via the Source Manager.
In the documentation for csXImage and in the naming of functions, the word Device is often used instead of Source.
TWAIN Versions and the Source Manager
For most of the time that TWAIN has been in use, the version number of the TWAIN specification was 1.x (i.e., 1.7, 1.8 etc.). In 2008, version 2.0 was released, and this has been updated several times, the latest version being 2.3 in 2013.
As well as adding some new features, version 2.0 introduced some significant changes, including:
- Memory management between the application and the source is handled in a new way.
- A new mechanism known as ‘callback’ is introduced for the sending of messages from the source to the application, in particular to let the application know that an image is ready to be transferred.
- The application is required to carry out image transfers in a separate thread so that responses to communications are not delayed.
csXImage checks whether or not the DSM is compatible with version 2.0 or above, and if it is, the newer memory management, communication and image transfer methods will be used. If the DSM is only capable of supporting version 1.x, then csXImage will revert to the legacy behaviour. It should not matter whether or not the source is compatible with version 2.0, as the DSM is backwards compatible and can communicate with older drivers. However, our experience shows that many older drivers behave badly when used with the newer DSM, so functions are provided in csXImage to manage this situation if necessary (see the properties TwainUseNewDSM and TwainCallbackMode).
The Data Source Manager is one of two files. It is either ‘TWAIN_32.DLL’, which should be found in the Windows directory, or it is ‘TWAINDSM.DLL’ which should be in the appropriate system directory. On 32-bit systems, this is the System32 directory. On 64-bit systems there can be two versions of TWAINDSM.DLL, a 32-bit version in the SysWOW64 directory and a 64-bit version in the System32 directory.
TWAIN_32.DLL is normally installed as part of the operating system and should always be present on all 32-bit or 64-bit versions of Windows. TWAINDSM.DLL is newer and it will be necessary to install this in order to support the 2.x versions of TWAIN. csXImage will work with whichever version it finds, so if you require that your application uses a particular version of the DSM, you must make sure that the chosen version is installed and available for use on the end user system.
The installer for csXImage copies the latest version of the 32-bit TWAINDSM.DLL to a directory called x86DSM under the installation path. If you want your application to use this file it should be copied to the appropriate location as described above (SysWow64 on a 64-bit system or System32 on a 32-bit system). The 64-bit TWAINDSM.DLL is installed automatically by the csXImage installer.
The following functions help to manage the version of TWAIN in use or provide information about the version.
TwainUseNewDSM As Boolean - By default, csXImage will first search for TWAINDSM.DLL in the appropriate system directory. If it is found, it will be used as the Data Source Manager. If it is not found, the older TWAIN_32.DLL will be used instead.
By setting this property to False, the behaviour is reversed, and TWAIN_32.DLL will be used as the first choice. Only if TWAIN_32.DLL is not found and TWAINDSM.DLL is found will TWAINDSM.DLL be used. This should never happen in practice, as TWAIN_32.DLL should always be available.
If this property is set it will cause the connection to the DSM to be closed and re-opened. It is therefore recommended that it should only be set in the first few lines of code before any other use of the TWAIN functions in csXImage. (Default = True).
TwainDSM2x As Boolean - Read-only Property. If this property returns True, the Data Source Manager currently in use supports version 2.0 or above of the TWAIN specification.
TwainDevice2x As Boolean - Read-only Property. If this property returns True, the device currently selected supports version 2.0 or above of the TWAIN specification.
TwainDeviceVersion As String - Read-only Property. The version number of the TWAIN specification supported by the device currently selected.
TwainDSMPath As String - Read-only Property. Gives the full path and file name of the Data Source Manager in use. This can be useful to confirm that the DSM in use is the one that is expected to be in use if multiple DSM files are available on the system.
TwainCallbackMode As Long - When using a new DSM compatible with TWAIN version 2.x, some problems can be experienced with older device drivers that are not compatible. In some cases this is due to the use of the new ‘callback’ method for communications between the source and the application.
This property has three possible values that determine whether or not callback will be used.
1 - Callback is always used if the DSM is version 2.x compatible.
2 - Callback is used if both the DSM and the device driver are version 2.x compatible.
3 - Callback is never used.
(Default = 2).
8.2.2. Selecting the Device
The first step to acquiring an image is to select the hardware device to be used. There are three alternative ways to do this. The first is to use the SelectTwainDevice method which will bring up a dialog box offering the user a choice from the list of devices installed on the system. Alternatively, the device number can be set directly using the CurrentTwainDevice property or the SelectTwainDeviceByName function can be called if the exact name is known.
Two other properties are provided to give access to information about the installed devices. These are TwainDeviceCount and TwainDeviceName. These could be used, for example, to create a custom dialog for device selection rather than using the default dialog in SelectTwainDevice.
Note that all hardware devices that have been installed on the system, i.e. their drivers are installed, will be available at this stage, regardless of whether or not they are physically connected to the system.
SelectTwainDevice ( ) As Boolean - Displays a standard dialog box containing a list of the devices installed on the system. After selecting from the list and clicking "Select", the value of CurrentTwainDevice will be set automatically. The return value is True if a device was selected and False if the user clicked the cancel button in the dialog box.
CurrentTwainDevice As Long - The index number of the currently selected TWAIN device. The first installed device on the system is number 0, so for example, on a system with 3 installed devices the possible values of CurrentTwainDevice would be 0, 1 or 2. A value of -1 indicates that no device is selected. (Default = -1).
TwainDefaultDevice As Long - The index number considered to be the default by the DSM. This will be the device initially highlighted when the SelectTwainDevice dialog is displayed. Note that this property is new in version 2.1 of the TWAIN specification and can be read but not set when using older versions of the DSM.
SelectTwainDeviceByName (Name As String) As Boolean - Selects a TWAIN device by its name, which must be an exact match with the name as it would be returned by the TwainDeviceName property. The name is case-sensitive. The return value is True if the device is successfully found and selected.
TwainDeviceCount As Long - Read-only property. The number of TWAIN compliant devices currently installed on the system. Note that this property counts all installed devices, it does not matter whether they are physically connected at the present time.
TwainDeviceName (Index As Long) As String - Read-only property. The name of the device referenced by Index.
8.2.3. Device Configuration
All TWAIN hardware devices have a built-in user interface that is normally displayed when the device is used. This allows the user to adjust settings such as resolution and image size before acquiring the image. By default, csXImage will display this interface, in which case it is not necessary to configure the device first.
By setting the UseTwainInterface property to False, this behaviour is overridden. In this case the image is acquired without displaying the interface and it will be necessary to configure the device first.
Properties and methods used for configuration are described in this section.
When values are set programmatically for these properties, csXImage will communicate directly with the currently selected device. At this stage it may be necessary for the device to be connected and you can check this using the TwainConnected property. Some values of properties cannot be set on some devices and this can be checked using other properties, e.g. TwainPixelTypeAllowed.
General Configuration Functions
TwainConnected As Boolean - Read-only property. If this property returns True, the device driver of the currently selected device reports that the device is physically connected.
TwainUnits As TxTwainUnits - The units of measure to be used for any measurement related to the image. This is an enumerated property which can take one of the following values:
- unInches: Inches
- unCentimeters: Centimeters
- unPicas: Picas
- unPoints: Points
- unTwips: Twips
- unPixels: Pixels
- unMillimeters: Millimeters
- unUnknown: No recognisable response from device
TwainUnitsAllowed (UnitType As TxTwainUnits) As Boolean - Read-only property. Returns True if the currently selected device will support the specified value for the TwainUnits property.
Essential Functions
The functions in this section can be considered as the basic, essential ones that commonly need to be used. They relate to the colour format, resolution and size of the image.
TwainPixelType As TxPixelType - The type of colour format used to define each pixel in the image. This is an enumerated property which can take any of the following values:
- ptBW: Black and white
- ptGray: Greyscale
- ptRGB: Red/Green/Blue Colour
- ptPalette: Paletted Colour
- ptUnknown: No recognisable response from device
TwainPixelTypeAllowed (PixType As TxPixelType) As Boolean - Read-only property. Returns True if the currently selected device will support the specified value for the TwainPixelType property.
TwainResolution As Double - The resolution of the image in pixels per unit of measure. For example, if TwainUnits is set to unInches, a value of 300 indicates a resolution of 300 dpi (dots per inch). Devices will only support particular values for TwainResolution as indicated by the properties TwainResMin, TwainResMax, TwainResStep, TwainResCount and TwainResAllowedValue. If TwainResolution is set to an unsupported value, the nearest allowable value will be used instead.
TwainResMin As Double - Read-only property. The minimum resolution of the image in pixels per unit of measure that is supported by the currently selected device.
TwainResMax As Double - Read-only property. The maximum resolution of the image in pixels per unit of measure that is supported by the currently selected device.
TwainResStep As Double - Read-only. The step size in supported resolutions of the currently selected device. For example, if a device has TwainResMin = 100, TwainResMax = 500 and TwainResStep = 50, it will support TwainResolution values of 100, 150, 200, 250, .etc , 500.
If TwainResStep has the value -1, this indicates that the step size between the minimum and maximum values is not uniform. In this case, the possible values for TwainResolution can be found from the TwainResCount and TwainResAllowedValue properties.
TwainResCount As Long - Read-only property. The number of possible values for TwainResolution. This is used in conjunction with the property TwainResAllowedValue to identify the exact values available for TwainResolution.
TwainResAllowedValue (Index As Long) As Double - Read-only property. Returns an allowed value for TwainResolution supported by the currently selected device from the list of available values. Index indicates the position of the value in the list.
Resolution in X and Y Directions
On many TWAIN devices there is no distinction between resolution in the X direction (across the page) and resolution in the Y direction (down the page). The properties described above, i.e., TwainResolution, TwainResMin, etc., are used to set the resolution to the same value in both directions.
If the current device supports the setting of different resolutions in the two directions, an alternative set of properties are available. These are:
XTwainResolution / XTwainResMin / XTwainResMax / XTwainResStep, and
YTwainResolution / YTwainResMin / YTwainResMax / YTwainResStep
These properties are used in exactly the same way as the properties already described, but allow for the resolution in the two directions to be set independently.
TwainLeft As Double - The position of the left side of the image, measured in TwainUnits from the left side of the device. For example, if TwainUnits is set to unInches and TwainLeft = 1.5, an image acquired from a scanner will begin 1.5 inches from the left side of the scanner.
TwainTop As Double - The position of the top of the image, measured in TwainUnits from the top of the device.
TwainRight As Double - The position of the right side of the image, measured in TwainUnits from the left side of the device.
TwainBottom As Double - The position of the bottom of the image, measured in TwainUnits from the top of the device.
SetTwainLayout (Left As Double, Right As Double, Top As Double, Bottom As Double) - This method allows the TwainLeft, TwainRight, etc. properties to be set simultaneously using a single command.
TwainMaxWidth As Double - Read-only property. The maximum physical width of the TWAIN device in TwainUnits, e.g., for a flatbed scanner, this will return the size of the flatbed. For devices with no meaningful size, e.g., cameras, -1 is returned.
TwainMaxHeight As Double - Read-only property. The maximum physical height of the TWAIN device in TwainUnits, e.g., for a flatbed scanner, this will return the size of the flatbed. For devices with no meaningful size, e.g., cameras, -1 is returned.
Image Quality Functions
These functions affect the quality of the image.
TwainBrightness As Double - The brightness of the image to be acquired. The units are arbitrary as defined by the device. Devices will only support particular values for TwainBrightness as indicated by the properties TwainBrightnessMin, TwainBrightnessMax and TwainBrightnessStep. If TwainBrightness is set to an unsupported value, the nearest allowable value will be used instead.
TwainBrightnessMin As Double - Read-only property. The minimum value of TwainBrightness in the arbitrary units used by the device. This value is normally -1000, but some devices may use other values.
TwainBrightnessMax As Double - Read-only property. The maximum value of TwainBrightness in the arbitrary units used by the device. This value is normally +1000, but some devices may use other values.
TwainBrightnessStep As Double - Read-only property. The step size in supported TwainBrightness values of the currently selected device.
If TwainBrightnessStep has the value -1, this indicates that the step size between the minimum and maximum values is not uniform.
TwainContrast As Double - The contrast of the image to be acquired. The units are arbitrary as defined by the device. Devices will only support particular values for TwainContrast as indicated by the properties TwainContrastMin, TwainContrastMax and TwainContrastStep. If TwainContrast is set to an unsupported value, the nearest allowable value will be used instead.
TwainContrastMin As Double - Read-only property. The minimum value of TwainContrast in the arbitrary units used by the device. This value is normally -1000, but some devices may use other values.
TwainContrastMax As Double - Read-only property. The maximum value of TwainContrast in the arbitrary units used by the device. This value is normally +1000, but some devices may use other values.
TwainContrastStep As Double - Read-only property. The step size in supported TwainContrast values of the currently selected device.
If TwainContrastStep has the value -1, this indicates that the step size between the minimum and maximum values is not uniform.
TwainThreshold As Double - This property determines the dividing line between black pixels and white pixels for black and white scanning. It can take any value from 0 to 255, and for most devices, the default value is 128. A smaller value gives a whiter image and a larger value gives a blacker image.
With many scanners it is necessary to set the PixelType property to ptBW before this property can be accessed.
Device Processing Functions
These functions are used to request that the device performs some processing while acquiring the image.
TwainAutoBright As Boolean - Setting this property to True will enable the Automatic Brightness function of the device, if available. Note that this property only has any effect with devices that support such a feature.
TwainAutoDeskew As Boolean - Setting this property to True will enable the Automatic Deskew Correction feature of the device, if available. This will rotate the image received from the device (usually a scanner) to align the image correctly when the paper has not been aligned correctly. Note that this property only has any effect with devices that support such a feature.
TwainAutoBorder As Boolean - Setting this property to True will enable the Automatic Border Detection feature of the device, if available. This will mean the border of the image or edge of the page is detected and the size of the acquired image set accordingly.
8.2.4. Acquiring the Image
The Acquire method is always used to read an image from the device. There are some options the user can set to define how the acquire process will be executed.
The main option is whether or not to use the default user interface provided by the device. This will determine whether it is necessary to configure the device before calling the Acquire method. The UseTwainInterface property is used to select this option. Note that some hardware devices do not allow the interface to be disabled. This behaviour can be determined by checking the CanDisableTwainInterface property.
If the user interface is disabled, it is still possible to display a progress bar while the image is being acquired by setting the ShowTwainProgress property.
The AcquireToFile method allows images to be saved direct to disk from the device driver without being processed through csXImage. This method is not available in the trial version.
Acquire ( ) - Starts the process of reading an image from the currently selected device. The exact behaviour of the Acquire method is determined by the following properties.
UseTwainInterface As Boolean - Determines whether the default user interface provided by the device will be displayed when the Acquire method is called. (Default = True).
ShowTwainProgress As Boolean - If this property is True, and UseTwainInterface is False, the device will display a progress bar during the acquisition of the image. If UseTwainInterface is True, this property has no effect. (Default = False).
WaitForAcquire As Boolean - If this property is True, the calling application will stop executing when the Acquire method is called and the next line of code will only be executed after the acquisition of the image has been completed. If this property is False, the calling application will continue to execute and the Acquire method simply initiates the acquisition process. In this case, the image held in the control will be overwritten at a later time when the Acquire method completes. (Default = True).
CanDisableTwainInterface As Boolean - Read-only property. Some devices do not allow their user interface to be disabled, which means they will ignore the setting of UseTwainInterface to False and always respond as if UseTwainInterface is True. This property indicates whether or not the currently selected device behaves in this way.
TwainBusy As Boolean - Read-only property. Indicates that the currently selected device is busy acquiring an image, i.e. the Acquire method has been called to start importing the image but this process has not yet been completed.
AcquireToFile (FileName As String) - Commands the currently selected device to acquire an image by direct file transfer. FileName must be a complete path to the file, including the file extension. The file will be written to disk by the device driver and will not be available in the control. The file format is determined by the FileFormat property.
Important note: AcquireToFile is not available in the trial version.
TwainFileTransferSupported As Boolean - Read-only property. Indicates whether the currently selected device supports direct file transfer, i.e., use of the AcquireToFile function.
TwainFileFormat As TxTwainFileFormat - The file format to be used when acquiring by direct file transfer using the AcquireToFile command:
- tfTIFF: TIFF format.
- tfPICT: PICT format.
- tfBMP: BMP format.
- tfXBM: XBM format.
- tfJPEG: JPEG (JFIF) format.
- tfFPX: FlashPix format.
- tfTIFFMult: Multi-page TIFF format.
- tfPNG: PNG format.
- tfSPIFF: Still Picture Interchange format.
- tfEXIF: EXIF format.
- tfPDF: Adobe PDF format.
- tfJP2: JPEG 2000 (.JP2) format.
- tfJPX: JPEG 2000 (.JPX) format.
- tfDJVU: Déjà vu file format by LizardTech.
- tfPDFA: Adobe PDF/A format.
- tfPDFA2: Adobe PDF/A format.
- tfUnknown: No recognisable response from device
TwainFileFormatAllowed (FileType As TxTwainFileFormat) As Boolean - Read-only property. Returns True if the currently selected device will support the specified value for the TwainFileFormat property.
8.2.5. Acquiring Multiple Images
Only one image at a time is normally processed by csXImage, however it is possible to acquire multiple images, e.g., by using a scanner with an automatic document feeder (ADF). This is achieved by setting the TwainMultiImage property to True, resulting in a sequence of images being read by the Acquire function.
Each image will overwrite the previous one. It is therefore necessary to place code in the OnAcquire event handler to process each image as it is received. This is typically done by saving the images to disk.
An example VB project is available showing the use of an ADF for multiple image acquisition.
Alternatively, it is possible to use the AcquireMultiFile method to automatically capture several images and save to file without the need to use the OnAcquire event.
TwainMultiImage As Boolean - Must be set to True to activate multi-image mode. (Default = False).
AcquireMultiFile (FileName As String) - This command enables multiple images to be acquired and saved to a file automatically. In a single command, it is the equivalent of setting TwainMultiImage to True, calling ClearTIF or ClearPDF to remove any images currently held in memory, calling AddToTIF or AddToPDF each time an image is received from the TWAIN device, then finally calling WriteTIF or WritePDF to save the multi-page file.
FileName must be a complete path to the file, including the file extension. The extension must be .tif, .tiff or .pdf. If the file already exists, it will be overwritten without warning.
The OnAcquire event can be used in conjunction with this method to process each image before it is added to the TIFF or PDF file in memory. This could for example be used to write a line of text on each page, rotate each page, etc.
KeepTwainInterfaceOpen As Boolean - By default, the user interface of the device is always closed after an image has been acquired. Unless an ADF is being used, this terminates the Acquire command. By setting KeepTwainInterfaceOpen to True, the interface remains open and can be used to acquire multiple images until closed by the user. The properties TwainMultiImage and UseTwainInterface must both be set to True for KeepTwainInterfaceOpen = True to be used. (Default = False).
TwainImagesToRead As Long - Sets the maximum number of images to acquire in multi-image mode. The Acquire command will stop when this number of images have been read. It may stop earlier if no more images are available, e.g., the document feeder is empty. Setting a value of zero for this property means an unlimited number of images will be read, i.e., the Acquire command continues until no more images are available. (Default = 0).
TwainPageCount As Long - Read-only property. The number of images that have been acquired by the most recent call to the Acquire command.
HasADF As Boolean - Read-only property. Indicates whether the currently selected TWAIN device has an automatic document feeder (ADF).
UseADF As Boolean - Determines whether an ADF (if available) will be used.
ADFLoaded As Boolean - Read-only property. Indicates whether the ADF is loaded with pages or not.
TwainDuplexSupported As Long - Read-only property. Indicates whether the currently selected TWAIN device supports duplex scanning. If so, it further indicates whether one-path or two-path duplex is supported. The value can be 0 (duplex unsupported), 1 (one-path duplex supported) or 2 (two-path duplex supported).
TwainDuplexEnabled As Boolean - Indicates whether or not duplex scanning is enabled.
8.2.6. Miscellaneous TWAIN Functions
This section describes miscellaneous TWAIN related functions.
Magnetic Ink Character Recognition (MICR)
TwainMICREnabled As Boolean - Enables Magnetic Ink Character Recognition (MICR) on scanners which support this feature. Must be set to True before calling the Acquire method. (Default = False).
TwainMICRString As String - Read-only property. The data returned by MICR is normally a character string. This property is used to retrieve the value for the most recently scanned image.
TwainMICRHandle As Long - Read-only property. Returns a Windows handle to the MICR data for the most recently scanned image. This must be called after TwainMICREnabled has been set to True and Acquire is complete.
Other Miscellaneous Functions
TwainAppName As String - Some TWAIN devices will display, or use in some other way, the name of the application which is calling them. For example, some scanners show a message such as "Scanning to Application XYZ..", while scanning is in progress. TwainAppName allows the name of your application to be set for such use by the device. By default, this is set to "csXImage", but you can change this to the name of your application.
If this property is set it will cause the connection to the DSM to be closed and re-opened. It is therefore recommended that it should only be set in the first few lines of code before any other use of csXImage.
UnloadTwain ( ) - Unloads the TWAIN Data Source Manager library from memory. Under normal circumstances there is never any reason to call this function, but it can be used to reset the control if an error occurs. After calling this function, the library will be reloaded automatically as soon as any function that requires it is called.
UnloadTwainDevice ( ) - Closes the connection to the currently selected device. This is similar to the UnloadTwain method except that it does not unload the DSM from memory.
Other image processing commands that are commonly used in conjunction with scanning are the Rotate, Crop, Despeckle and Deskew commands. For information about these see Section 3 & Section 4.
9. Display Options
When an instance of csXImage is added to a container (form) in a programming environment it occupies a rectangle determined by its Left, Top, Width and Height properties. At design time, it appears as a rectangle bounded by a dotted line, but at run time it is invisible if no image is loaded in the control. When an image is loaded, either the whole image will be displayed, if it is smaller than the size of the control, or the top-left portion of the image will be displayed, with vertical and/or horizontal scroll bars allowing the image to be scrolled.
The functions described in this section allow the appearance of the control and the image as displayed on screen to be modified. Changing these properties has no effect on the underlying image held in memory.
Left As Single - The distance between the left edge of the control and the left edge of its container.
Top As Single - The distance between the top edge of the control and the top edge of its container.
Width As Single - The width of the control. Note that this is not the same as the width of the image loaded into the control.
Height As Single - The height of the control. Note that this is not the same as the height of the image loaded into the control.
Visible As Boolean - Determines whether the control and the image loaded into it are visible or hidden.
Zoom As Double - Determines the size of the image as it is displayed on screen. The value of Zoom is the percent of normal size, i.e., if Zoom is 100(%), the image is displayed normal size. Zoom does not affect the actual image stored in the control, it only affects how it is displayed. Note that when the AutoZoom property is set to True, Zoom becomes a read-only property as any value assigned to it will be overwritten. (Default = 100).
The display quality of 24 bit colour images when Zoom < 100.0 is affected by the Resample property. Try setting the value of Resample to True if display quality appears to be poor.
AutoZoom As Boolean - If set to True, images will be zoomed automatically to fit within the current Width and Height of the control. Only images which are too large for the control are affected, small images will not be zoomed-in by AutoZoom. (Default = 100).
ZoomToSelection ( ) - Zooms the image automatically to fit the selected region (see Section 10) into the visible area of the control. Note that AutoZoom will be set equal to False following a call of the ZoomToSelection function.
ZoomedHeight As Long - Read-only property. The height of the zoomed image, in pixels, as it is displayed on screen.
ZoomedWidth As Long - Read-only property. The width of the zoomed image, in pixels, as it is displayed on screen.
ScaleToGray As Boolean - If set to True, black and white images will be displayed in grayscale when the value of Zoom is < 100.0. This improves the quality of the displayed image which would otherwise appear to break up at low zoom factors. The underlying image held by csXImage is not affected, only the view of it that is displayed. (Default = True).
HasScrollBarHoriz As Boolean - Read-only property. This will be True of the image is currently displaying a horizontal scroll bar.
HasScrollBarVert As Boolean - Read-only property. This will be True of the image is currently displaying a vertical scroll bar.
ScrollBarHorizPos As Long - The position of the horizontal scroll bar in pixels. This value is equal to the distance in pixels between the left side of the image and the left-most pixel currently displayed. This property can be both read and written, allowing the image to be scrolled programmatically.
ScrollBarVertPos As Long - The position of the vertical scroll bar in pixels. This value is equal to the distance in pixels between the top edge of the image and the top-most pixel currently displayed. This property can be both read and written, allowing the image to be scrolled programmatically.
ScrollBarHorizWidth As Long - Read-only property. The width of the horizontal scroll bar in pixels. This value is also equal to the width of the displayed portion of the image.
ScrollBarVertHeight As Long - Read-only property. The height of the vertical scroll bar in pixels. This value is also equal to the height of the displayed portion of the image.
ShowScrollBars As Boolean - If set to False, the scroll bars will be hidden. An image with hidden scroll bars can be scrolled programmatically using the ScrollBarHorizPos and ScrollBarVertPos properties. (Default = True).
ScrollSpeed As Long - The number of pixels by which the image is scrolled when the arrows on the scrollbars are clicked. Increasing this value will increase the speed of scrolling. (Default = 1).
KeepScrollPos As Boolean - If set to True, the current scrolled position of the image (i.e., ScrollBarHorizPos and ScrollBarVertPos) will be retained when a new image is loaded. (Default = False).
Redraw ( ) - Forces an immediate redraw of the control.
10. Selecting a Region of an Image
These functions allow a region of an image to be selected so that it can be processed separately from the remainder of the image. The selection can either be done programmatically or interactively by use of a mouse.
SelectRectangle (X1 As Long, Y1 As Long, X2 As Long, Y2 As Long) - Selects a rectangular region bounded by X1, Y1 and X2, Y2.
SelectEllipse (X1 As Long, Y1 As Long, X2 As Long, Y2 As Long) - Selects an elliptical region. The ellipse is bounded by the rectangle defined by the points X1, Y1 and X2, Y2.
MouseSelectRectangle ( ) - Selects a rectangular region of the image by using the mouse. The selection is started by pressing and holding the left mouse button. This defines one corner of the region. The mouse is then moved to the opposite corner of the region and the mouse button released. Code execution does not continue to the next line after the MouseSelectRectangle call until the mouse actions are completed, unless the call is cancelled using CancelSelection.
In some programming environments, a crash can occur if the form is closed while waiting for MouseSelectRectangle to be completed. This can be avoided by putting a call to the CancelSelection method in an appropriate event handler that is called when closing a form, e.g., the QueryUnload procedure in Visual Basic, the OnCloseQuery procedure in Delphi, or an equivalent.
MouseSelectEllipse ( ) - Selects an elliptical region of the image by using the mouse. This method operates in exactly the same way as MouseSelectRectangle.
MouseSelectToEdge As Boolean - Modifies the behaviour of the MouseSelectRectangle and MouseSelectEllipse methods when the mouse cursor is moved off the edge of the image during the selection process. If False, the selection stops changing when the cursor leaves the image, and releasing the mouse button cancels the selection. If True, the selection follows the cursor when it leaves the image allowing selection up to the edge or corner of the image, and releasing the mouse button completes the selection. (Default = False).
GetSelectionCoords (X1 As Long, Y1 As Long, X2 As Long, Y2 As Long) - Retrieves the values of the X1, Y1 and X2, Y2 co-ordinates of a currently selected rectangle or ellipse.
SelectionX1 As Long - Read-only property. The value of the X1 co-ordinate of a currently selected rectangle or ellipse.
SelectionX2 As Long - Read-only property. The value of the X2 co-ordinate of a currently selected rectangle or ellipse.
SelectionY1 As Long - Read-only property. The value of the Y1 co-ordinate of a currently selected rectangle or ellipse.
SelectionY2 As Long - Read-only property. The value of the Y2 co-ordinate of a currently selected rectangle or ellipse.
CancelSelection ( ) - Cancels the current selection, so no region is selected. The property UseSelection is set to False. CancelSelection can also be used to end a MouseSelectRectangle or MouseSelectEllipse call without receiving input from mouse actions.
UseSelection As Boolean - If this property is set to True, certain functions when used will be applied to the selected region, not to the whole image. This applies to the following functions:
- SaveToFile
- InsertTIF
- WriteBinary
- BMPHandle
- NewFileSize
- Copy
- Brightness
- Contrast
- Sharpen & SharpenBy
- Blur & BlurBy
- ReduceRedEye
- PrintImage
(Default = False).
SelectionVisible As Boolean - Determines whether the outline of the selected region is displayed on the image. (Default = True).
SelectionType As TxSelectionType - Read-only property. Identifies which shape of region is currently selected.
SelectionType can be one of:
- seNone : No region currently selected.
- seRectangle : A rectangle is currently selected.
- seEllipse : An ellipse is currently selected.
11. Events
The following events are raised by the control:
OnMouseMove (ShiftState As Integer, X As Long, Y As Long) - This event occurs when the mouse is moved over any part of the ImageBox control, including the image area, the scrollbars if present, or the empty part of the control when an image smaller than the control is loaded. It is also fired by the mouse moving over the empty control with no image loaded.
OnMouseDown (Button As Integer, ShiftState As Integer, X As Long, Y As Long) - This event occurs when a mouse button is pressed over any part of the control.
OnMouseUp (Button As Integer, ShiftState As Integer, X As Long, Y As Long) - This event occurs when a mouse button is released over any part of the control.
Button is an integer which identifies the mouse button that was pressed or released to fire an OnMouseDown or OnMouseUp event. The value of Button corresponds to the values in ShiftState below, i.e., Left = 1, Right = 2, Middle = 4.
ShiftState is an integer which indicates the status of the mouse buttons and the SHIFT, CTRL and ALT keys on the keyboard at the time the event was fired. ShiftState is a bit field where each bit corresponds to a button or key and is set if the button or key is down. The bits are defined as follows:
| Bit no. | Value | Button or Key |
|---|---|---|
| 0 | 1 | Left Mouse Button |
| 1 | 2 | Right Mouse Button |
| 2 | 4 | Middle Mouse Button |
| 3 | 8 | SHIFT Key |
| 4 | 16 | CTRL Key |
| 5 | 32 | ALT Key |
For example, if the left mouse button plus the SHIFT key were pressed, the value of ShiftState would be 9 (= 1 + 8).
X and Y give the co-ordinates of the mouse position over the control, measured in pixels from the top left corner of the control. Note that these co-ordinates may not correspond to the co-ordinates of the pixel in an image under the mouse pointer due to the image being in a scrolled position. The read-only properties of the control which give information about the scroll bar status and the Zoom property can be used to work out the actual pixel co-ordinates. (For VB users, the demo VB application provided with csXImage contains an example of how this can be achieved. This is in the procedure "mnuToolsPixelInfo".)
OnClick ( ) - This event occurs when the left mouse button is clicked (pressed and then released) over any part of the control.
OnDblClick ( ) - This event occurs when the left mouse button is double-clicked over any part of the control.
OnScroll ( ) - This event occurs when the image is scrolled, either manually, by the user clicking on the scrollbars, or programmatically, by setting the ScrollBarHorizPos or ScrollBarVertPos properties in code.
OnAcquire ( ) - This is raised when acquisition of an image from a TWAIN device is completed.
OnAcquireFinish ( ) - This is raised when the Acquire command completes execution, i.e., the last image of one or more images is acquired.
OnAcquireCancel ( ) - This is raised when the acquisition of an image from a TWAIN device is cancelled, for example by a user closing the device's user interface or clicking the Cancel button on the progress bar.
OnDragDrop ( ) - This is raised when an image is successfully loaded by dragging and dropping a file onto the control.
OnStartDragDrop ( ) - This is raised when an image file is dragged and dropped onto the control, before the file is loaded. By adding code into this procedure it is possible to cancel the drag and drop operation conditionally using the DragDropCancel method. For example, a dialogue box could be presented to the user asking them to confirm or cancel the operation.
The mouse events (OnMouseMove, OnMouseDown and OnMouseUp) return values of X and Y that give the co-ordinates of the cursor position. These co-ordinates are the position on the control itself and will not correspond to the actual pixel co-ordinates of the image if the image is either zoomed or scrolled. The ConvertEventXY method can be used to obtain the pixel co-ordinates.
ConvertEventXY (X As Integer, Y As Integer, XImage As Integer, YImage As Integer) - Calculates the pixel co-ordinates XImage and YImage given the co-ordinates X and Y relative to the control. If the location of X, Y is not over an image, i.e., it is either on the scrollbars or the control is empty, then -1 is returned for both XImage and YImage.
For example, the following VB code placed in the event procedure for the OnMouseDown event would draw a black pixel at the location of the mouse cursor, regardless of whether the image is zoomed or scrolled.
ImageBox1.ConvertEventXY X, Y, XImage, YImage
If XImage <> -1 Then
ImageBox1.PixelColor(XImage, YImage) = vbBlack
End If
12. File Info (JPEG Meta Data) and EXIF Attributes
12.1. File Info (JPEG Meta Data) or IPTC Text
The JPEG, TIFF and PSD file format allows for text describing the image to be embedded in the file header. This is used in a number of applications including journalism (IPTC text). If a file is loaded that contains File Info readable by csXImage the property HasFileInfo is set to true and the relevant properties are set. To save a file with File Info the relevant data properties must be set. The HasFileInfo property will be set to true when any of the properties are written to. File Info can be read from or written to a separate file, either using the older .FFO format or the newer XML based .XMP format.
IPTC Core properties that are embedded inside files in the XMP data format are also supported. These properties are described later in this section. Their presence is indicated by the HasXMP property and they are cleared using the XMPClear method. These properties are only supported in JPEG and TIFF files.
Many of the IPTC / File Info properties shown below are also stored inside the file in XMP format. If the values are different, the version used is determined by the value of the XMPPriority property. When this is True (the default) the XMP version is used.
12.1.1. File Info Properties
HasFileInfo As Boolean. When an image is loaded that contains File Info this property is set to True. It also determines whether File Info is exported with a JPEG, TIFF or PSD. Setting any File Info property sets HasFileInfo to True. (Default = False).
FFO_Caption As String.
FFO_CaptionWriter As String.
FFO_Headline As String.
FFO_SpecialInstructions As String.
FFO_Category As String.
FFO_Byline As String.
FFO_BylineTitle As String.
FFO_Credit As String.
FFO_Source As String.
FFO_ObjectName As String.
FFO_City As String.
FFO_ProvinceState As String.
FFO_CountryName As String.
FFO_OTR As String - Original Transmission Reference.
FFO_CopyrightNotice As String.
FFO_ImageURL As String.
FFO_Urgency As Integer. Not saved/empty if set to 0.
FFO_DateCreated As Date.
FFO_CopyrightFlag As Boolean.
The following properties are aliases of properties used above. They reflect the fact that Adobe Photoshop 7 and above use different property names from previous versions.
FFO_Title As String. Alias of FFO_ObjectName.
FFO_Author As String. Alias of FFO_Byline.
FFO_AuthorsPosition As String. Alias of FFO_BylineTitle.
Setting one property value also sets the corresponding alias property value, so FFO_Title will always have the same value as FFO_ObjectName.
The following properties extend the copyright status to work with Adobe Photoshop 7 and above where three copyright states are possible, "Copyrighted Work", "Public Domain" and "Unmarked". FFO_Marked is stored in the XMP block and although it can be True or False, it can also be undefined (not present).
FFO_Marked As Boolean. (Default = True).
FFO_MarkedDefined As Boolean. This determines whether the FFO_Marked property is defined
in the file.
"Copyrighted Work" corresponds to FFO_CopyrightFlag = True or FFO_Marked = True.
"Public Domain" corresponds to FFO_Marked = False and either value for FFO_CopyrightFlag.
"Unmarked" corresponds to FFO_CopyrightFlag = False and FFO_Marked is undefined (FFO_MarkedDefined = False).
The Keywords and Supplemental Categories properties are zero based arrays of strings. Some additional properties and methods are needed to read and write them.
FFO_Keywords (Index As Long) As String. The keyword defined by the integer Index.
FFO_KeywordsCount As Integer. Read-only property. The number of items in the list.
FFO_KeywordsAdd (Keyword As String) As Long - Adds the string Keyword to the end of
the list. Returns the new number of items in the list as an integer.
FFO_KeywordsDelete(Index As Long) - Deletes the keyword defined by the
integer Index.
FFO_KeywordsClear ( ) - Deletes all the keywords.
FFO_KeywordsInsert (Index As Long, Keyword As String) - Inserts the string
Keyword at position Index in the list. Index is an integer.
FFO_SuppCat(Index As Long) As String. The category defined by the integer Index.
FFO_SuppCatCount As Integer - Read-only property. The number of items in the list.
FFO_SuppCatAdd (Cat As String) As Long - Adds the string Cat to the end of the list.
Returns the new number of items in the list as an integer.
FFO_SuppCatDelete(Index As Long) - Deletes the category defined by the integer
Index.
FFO_SuppCatClear ( ) - Deletes all the categories.
FFO_SuppCatInsert (Index As Long, Cat As String) - Inserts the string
Cat at position Index in the list. Index is an integer.
The following additional IPTC fields are also supported. These are listed separately as there are fewer software packages which support these fields.
FFO_EditStatus As String.
FFO_FixtureIdentifier As String.
FFO_DateReleased As Date.
FFO_TimeReleased As Date.
FFO_ReferenceService As String.
FFO_ReferenceDate As Date.
FFO_ReferenceNumber As String.
FFO_TimeCreated As Date.
FFO_OriginatingProgram As String.
FFO_ProgramVersion As String.
FFO_ObjectCycle As String.
FFO_Sublocation As String.
FFO_CountryCode As String.
FFO_LocalCaption As String.
FFO_CustomField1 As String.
FFO_CustomField2 As String.
. There are 20 custom fields in total.
FFO_CustomField19 As String.
FFO_CustomField20 As String.
FFO_ImageNotes As String.
12.1.2. IPTC Core Properties (XMP)
These properties are defined by the IPTC Core Schema for XMP. Some care should be taken when using them because it is a more recent standard and not all software with IPTC support will support these properties.
FFO_CiAdrExtAdr As String. Extra address field for creator contact info.
FFO_CiAdrCity As String. City field for creator contact info.
FFO_CiAdrRegion As String. Region field for creator contact info.
FFO_CiAdrCtry As String. Country field for creator contact info.
FFO_CiAdrPcode As String. Postal code field for creator contact info.
FFO_CiTelWork As String. Creator contact telephone number.
FFO_CiEmailWork As String. Creator contact email address.
FFO_CiUrlWork As String. Creator contact URL.
FFO_HasContactInfo As String. Read-only property. This property is True if any of the above
creator contact fields are present.
FFO_IntellectualGenre As String.
FFO_RightsUsageTerms As String.
The Scene and Subject Code properties are zero based arrays of strings. Some additional properties and methods are needed to read and write them.
FFO_Scene (Index As Long) As String. The scene defined by the integer Index.
FFO_SceneCount As Integer. Read-only property. The number of items in the list.
FFO_SceneAdd (Scene As String) As Long - Adds the string Scene to the end of
the list. Returns the new number of items in the list as an integer.
FFO_SceneDelete(Index As Long) - Deletes the scene defined by the
integer Index.
FFO_SceneClear ( ) - Deletes all the scenes.
FFO_SceneInsert (Index As Long, Scene As String) - Inserts the string
Scene at position Index in the list. Index is an integer.
FFO_SubjectCode (Index As Long) As String. The subject code defined by the integer Index.
FFO_SubjectCodeCount As Integer. Read-only property. The number of items in the list.
FFO_SubjectCodeAdd (Code As String) As Long - Adds the string Code to the end of
the list. Returns the new number of items in the list as an integer.
FFO_SubjectCodeDelete(Index As Long) - Deletes the subject code defined by the
integer Index.
FFO_SubjectCodeClear ( ) - Deletes all the subject codes.
FFO_SubjectCodeInsert (Index As Long, Code As String) - Inserts the string
Code at position Index in the list. Index is an integer.
Many of the properties defined in the IPTC Core are duplicates of existing IPTC properties, for example Description (FFO_Caption), City (FFO_City) and the keywords. These duplicate properties can be accessed through the properties described in Section 12.1.1 above. There are many other properties stored in the XMP data block which are not supported by csXImage.
The following methods and properties are used to manage the XMP data.
HasXMP As Boolean. Read-only property. This is set to True when XMP properties are present.
KeepXMP As Boolean. When this is True, XMP data will be saved with a JPEG or TIFF file. Set this property to False to prevent the data from being saved. (Default = True).
XMPPriority As Boolean. If the same property is stored as both IPTC/IIMV4 and XMP inside a JPEG or TIFF, XMPPriority determines which version is used when the image is loaded. When True, the XMP version will be used. This only applies to reading images and csXImage will use the same value for both formats when writing. (Default = True).
XMPClear ( ) - Deletes all data stored in the XMP block.
12.1.3. Other XMP Properties: Rating and Rating Percent
Two other meta data properties are supported and these come under the category of XMP. The property names have the prefix FFO_ like the IPTC properties described above although they are not part of the IPTC specification.
FFO_Rating As Integer. This is the rating that is recognised in Windows 7 and Vista and is usually shown
as a number of stars. It should have a value between 1 and 5. If it is zero it is null and will not be stored.
FFO_RatingPercent As Integer. This is part of the Microsoft Photo Schema and should have a value
between 1 and 100. If it is zero it is null and will not be stored.
Note that csXImage does not verify the range of values when either FFO_Rating or FFO_RatingPercent are set, so it is possible to give them unsuitable values. They are cleared by setting them to zero and are also cleared when XMPClear is called.
12.1.4. File Info Methods
FFO_Clear ( ) - Deletes all File Info values and sets HasFileInfo to false.
FFO_Save (FileName As String) - Writes the File Info data to a file (.FFO or .XMP file).
FileName is the physical path and file name, complete with extension.
FFO_Load (FileName As String) - Loads File Info data from a file (.FFO or .XMP). FileName is
the physical path and file name, complete with extension.
OverwriteMetaData (FileName As String) - This writes the File Info and Exif data of the current image to the JPG file specified by FileName. This method is required because otherwise, repeated loading and saving of a JPG image can cause deterioration of the image quality as the image is recompressed. Use of OverwriteMetaData allows the File Info and Exif data to be edited without changing the image data itself. For example:
ImageBox1.LoadFromFile("C:\Images\Image1.JPG")
ImageBox1.FFO_Caption = "A new caption"
ImageBox1.OverwriteMetaData("C:\Images\Image1.JPG")
This will change the Caption property of the image and modify it on disk without changing the image data.
ReadMetaData (FileName As String) - This reads the File Info and Exif data of the JPEG or TIFF file specified by FileName into the current image without reading the image itself or replacing the existing image. An existing image must be loaded in the control before calling ReadMetaData.
Important note: OverwriteMetaData and ReadMetaData are not available in the trial version.
ClearMetaData ( ) - This clears all the meta data from the image, and is the equivalent of calling FFO_Clear, XMPClear and ExifClear.
12.2. Exif Attributes
Exif (Exchangeable Image File Format) attributes can be stored in JPEG or TIFF files and are written by many digital cameras and some software packages. They contain information about the image and the camera settings and conditions when the image was created.
The Exif attributes (or tags) can be read, written or deleted using csXImage. As there are over 100 different attributes we have not provided a property for each, in the way we have with IPTC text. Instead the attributes are held in an indexed array as strings. Each attribute can be accessed by its index in this array, or by name. Attributes can be written using the attribute name, which is not case sensitive.
12.2.1. Reading Exif Attributes
ExifValueByIndex (Index As Long) As String - Read-only property. Returns the value of the Exif attribute as a string given the index within the array.
ExifValueByName (Name As String) As String - Read-only property. Returns the value of the Exif attribute as a string given the name of the attribute.
ExifName (Index As Long) As String - Read-only property. Returns the name of the Exif attribute as a string given the index of the attribute.
ExifCount As Long - Read-only property. The number of Exif attributes.
ExifClear ( ) - Method to clear all the attributes. After calling ExifClear any JPG image saved will have no Exif attributes.
12.2.2. Writing Exif Attributes
Individual Exif attributes can be written or deleted. They are always specified by the name of the attribute.
ExifSetAttribute (Name As String, Value As String) As Boolean - The Exif attribute Name is set to Value. If the attribute is set successfully the return value is True, otherwise it is False. If Name is invalid or if Value is not in the correct format the attribute will not be set.
ExifDelete (Name As String) As Boolean - The Exif attribute Name is deleted. If the deletion is successful the return value will be True. If Name is not a valid attribute name the return value will be False.
12.2.3. Exif Data Types
Each Exif attribute is stored as one of the data types listed below.
BYTE - An 8 bit unsigned integer.
ASCII - An ASCII character.
SHORT - A 16 bit (2 byte) unsigned integer.
LONG - A 32 bit (4 byte) unsigned integer.
RATIONAL - Two LONGs. The first is the numerator and the second is the denominator. The RationalToReal function can convert one of these values to a real number. The ExifSetAttribute function can accept either a real number or a rational number, in string format, so "3/2" and "1.5" would both be accepted by ExifSetAttribute. On systems where the comma character is used as a decimal point, this automatic conversion from real to rational will not work so the RealToRational method should be used if a conversion is required.
UNDEFINED - An 8 bit byte that can take any meaning depending on the field definition. This will be returned as a 2 character string of the hexadecimal byte value. Where multiple values are stored in the same attribute they are returned as a comma separated string. The 'ExifVersion' attribute would return "30,32,32,30" for Exif 2.2. The 'ExifVersion' attribute is defined to contain 4 bytes and each byte represents an ASCII character, so the bytes shown here translate to "0220". Other Undefined attributes will have different meanings and will not necessarily represent ASCII characters.
SLONG - A 32 bit (4 byte) signed integer.
SRATIONAL - Two SLONGs. The first is the numerator and the second the denominator.
Date and time attributes are stored as strings in the format "YYYY:MM:DD HH:MM:SS". The ExifStringToDate and ExifDateToString functions can convert between this string format and the date/time format used by ActiveX components.
12.3. Exif Helper Functions
The following functions convert data from values stored in the Exif attributes into more usable forms, or convert data into a string value for use with the ExifSetAttribute method.
RationalToReal (Value As String) As Double - Value is a string of the form "A/B" where A and B are integers and it returns a real number. It is used for converting a value stored as RATIONAL or SRATIONAL into a real number for further processing.
RealToRational (Value As Double) As String - This function returns a string of the form “A/B” where A and B are integers. It can be used to convert a number into a string that can be used where a RATIONAL or SRATIONAL number is required.
ExifStringToDate (Value As String) As Date - Value is a string containing a date/time of the form "YYYY:MM:DD HH:MM:SS", which is how date/time Exif attributes are stored. The return value is in the format of an ActiveX date/time variable. If Value is not in the correct format the return value will be zero. It will not generate an error.
ExifDateToString (Value As Date) As String - Value is an ActiveX date/time and the return value is the date and time in the form "YYYY:MM:DD HH:MM:SS". This can be used for converting a date/time into a string that can be used by the ExifSetAttribute function.
The following functions return information about the Exif attributes. This information can be found in the Exif specification but these functions can provide a useful reference and also clarify the values that csXImage uses.
ExifAttributeName (Tag As Long) As String - Tag is the 2 byte integer ID for the attribute. The return value is the string value of the attribute name as it is used by the other functions in this section.
ExifDataType (Name As String) As Long - This returns the Exif data type for the Name attribute. Possible return values are 1 - BYTE, 2 - ASCII, 3 - SHORT, 4 - LONG, 5 - RATIONAL, 7 - UNDEFINED, 9 - SLONG, 10 - SRATIONAL.
ExifDataCount (Name As String) As Long - This returns the size of the Name attribute. It is the number of data items, not the number of bytes occupied. For ASCII and UNDEFINED data types of variable length this value is zero.
The UserComment attribute is stored using the UNDEFINED data type so it is returned as a comma separated string of hexadecimal values. It is really a string preceded by a header which identifies the format as ANSI or Unicode. To allow easy reading and writing of this attribute the ExifUserComment property is provided.
ExifUserComment As String - The value of the Exif UserComment attribute, which may optionally contain Unicode characters.
12.4. Exif Thumbnails
In JPG images a smaller copy of the image, or thumbnail, can be stored with the EXIF data. csXImage does not store this by default but this behaviour can be controlled by setting the KeepExifThumbnail property.
KeepExifThumbnail As Boolean - When true, JPG images will be saved with a thumbnail inside the EXIF data block. The OverwriteMetaData method will preserve any EXIF thumbnail while replacing the metadata. The thumbnail will only be stored if the image contains at least one EXIF property. (Default = False).
RationalToReal (Value As String) As Double - Value is a string of the form "A/B" where A and B are integers and it returns a real number. It is used for converting a value stored as RATIONAL or SRATIONAL into a real number for further processing.
12.5. XP Summary Information
Windows XP allows some JPG meta data to be edited through Windows Explorer by selecting file properties. This data is stored with the Exif data although it is not stored using the recognised Exif standard. Five additional properties allow this data to be accessed with csXImage.
XP_Title As String.
XP_Comments As String.
XP_Keywords As String.
XP_Author As String.
XP_Subject As Boolean.
These values also appear in the list of Exif attributes and are cleared by calling ExifClear. It is difficult to read and write them correctly because they do not obey the Exif specification so it is recommended to use the properties provided.
These properties are also supported in Windows Vista but some of the properties set in Windows Vista are stored as XMP and will appear as IPTC (File Info) properties when read using csXImage. In Windows Vista, TIFF images can have these properties inserted through Windows Explorer.
12.6. Trailing Meta Data
It has come to our attention that some meta data editing software incorrectly stores meta data at the end of JPG images. This results in the same software being unable to read changes made using our OverwriteMetaData method, as it inserts the meta data into the header and leaves the rest of the file untouched. We have introduced a method to remove this data from the end of JPG files.
DeleteTrailingData (FileName As String) - FileName is the physical path to a JPG file and is a string. Calling this method will remove any bytes from the file that are after the end of image marker.
This two method should not be needed under normal circumstances. It is provided to deal with a known issue caused by some meta data editing software when the images are edited using OverwriteMetaData.
13. Miscellaneous Functions
These are functions which do not logically fit into any other section of this instruction manual.
Clear ( ) - Deletes the current image from memory and redraws the empty control.
NewImage (NewWidth As Long, NewHeight As Long) - Creates a new image of size NewWidth x NewHeight pixels. The Image is filled with the colour specified in BrushColor. Any existing image in the control is cleared from memory without warning. By default, the image has ColorFormat of cf24bit.
Cursor As Integer - Selects the cursor to be displayed when the mouse is over the control. Predefined cursors numbered -1 to -22 correspond to the standard cursors available in Borland Delphi. Custom cursors can be loaded from file using the AddCursor function.
Some commonly used cursors are:
- Arrow: -1
- Cross: -3
- I-Beam: -4
- Hourglass: -11
- Pointing hand: -21
- Resize all: -22
AddCursor (Index As Integer, FileName As String) - Reads an image from file and stores the image in a list of cursors, referenced by Index. The image file should be of filetype .cur, .ico or .ani. The cursor can subsequently be used by setting the Cursor property to the value Index. Any unique value can be chosen for Index.
The following is an example of how to use a specific cursor in VB:
ImageBox1.AddCursor 1, "C:\WINNT\Cursors\harrow.cur"
ImageBox1.Cursor = 1
hWnd As Long - Returns the Windows handle to the current instance of csXImage.
PixelArray (Row As Long) As Variant - This property provides access to a complete row of pixels as an array of bytes. Row is measured from the top of the image where 0 is the top row and (ImageHeight - 1) is the bottom row. The exact format of the bytes will depend on the colour depth. For a 24-bit image there will be three bytes per pixel with the first being the blue component, the second the green and the third the red component. For an 8-bit image there will be one byte per pixel which represents the palette index. For a 4-bit image each byte represents the palette index for two pixels. For a 1-bit image, each byte represents 8 pixels.
BytesPerRow As Long - Read-only property. Returns the number of bytes used by a row of pixels. It is the size of the variable returned by PixelArray.
Version As String - Read-only property. Returns the version information for the OCX file.
AboutBox ( ) - Displays a dialogue box with information about the OCX file, including the version number.
14. Installation, Getting Started and Deployment
14.1. Compatible Operating Systems
csXImage can be used on the following operating systems:
- Windows XP
- Windows Vista
- Windows 7
- Windows 8 & 8.1
- Windows 10
- Windows Server versions from 2003 to 2019
If you require a version that is compatible with older operating systems, we can provide this. Please contact us to request this.
14.2. Installation in the Development Environment
Both the full and trial versions of csXImage are provided as self-installing executable files. These installation instructions will relate to the trial version as this is the first version most people will use. The installation procedure is essentially the same for purchased versions.
After running the installer, files are copied to the Program Files (x86) folder, or Program Files on a 32-bit operating system, under the path Chestysoft\csXImageTrial. There are two versions of the ActiveX file csXImageTrial.ocx, a 32-bit version and a 64-bit version. These are installed in subfolders called x86 and x64 respectively. On a 64-bit operating system both versions are installed, but on a 32-bit operating system only the 32-bit version is installed. Demo files are copied to the users Documents folder.
In addition to the ocx files, the following files are also installed:
csXImageTrial.lic: The licence file needed when using the control in a development environment.
csXImage Instructions.pdf: This manual.
twaindsm.dll: The TWAIN Source Manager (shared library). There are two versions of this file, for 32-bit and 64-bit applications. The 64-bit version is installed in the appropriate system directory. The 32-bit version is copied to a directory called x86DSM under the installation path for manual installation if required.
csximagetrial.lpk: Licence package file for use with a web application.
Under Documents\Chestysoft csXImageTrial \Demos: Various example applications, accessible from the Windows Start Menu.
For purchased versions of csXImage, the installation also includes a file csXImage.cab. This is a copy of the OCX file, compressed into a CAB file and digitally signed. It is for use in web applications.
14.3. Trial Version
Images processed using the trial version have a line of text added at the top, to indicate that an unregistered version is being used. Apart from this it is fully functional with the exception of the AcquireToFile, OverwriteMetadata and ReadMetadata functions that are not available. There is no time limit. Visit the Chestysoft website for details of how to buy the full version.
14.4. 32-bit and 64-bit Versions
On a 64-bit operating system, two versions of the control are installed: a 32-bit version in the x86 subfolder and a 64-bit version in the x64 subfolder. Both files have the same name and same class id but are registered independently in the 32-bit and 64-bit sections of the registry.
When using a development environment that can compile both 32-bit and 64-bit applications, such as Visual Studio, there is no need to distinguish which version of the control is to be used. The correct version will automatically be found depending on whether the calling application is 32-bit or 64-bit.
14.5. Getting Started
To use this control in a Visual Basic project, select Project and Components from the pull down menu. This gives a list of available controls. Select csXImage Library (or csXImageTrial Library) and click Apply. This adds the control to the component palette. The class name is "ImageBox" and this will appear in the Object Browser where the properties and methods are listed. For other design environments, consult the documentation for importing ActiveX controls.
The Programme ID for the control is "csXImage.ImageBox" and this is used inside the CreateObject command when creating an instance of the object from code. In the trial version this ID is "csXImageTrial.ImageBox".
As an ActiveX control, csXImage can be used in a range of Windows based environments and languages. There will be slight differences in syntax especially with object creation, the use of parentheses/brackets surrounding method parameters, and the use of constants for enumerated properties.
A wide range of code examples are available on our website to help you start using csXImage. Visit the csXImage home page for an overview, or go directly to a specific example using one of the links below:
14.5.1. Code Examples
- Visual Basic.NET
- Loading, saving and adding effects - This example is supplied with the trial version.
- Zoom - An example of zooming an image.
- File Info - An example of editing IPTC text and EXIF data in TIFF or JPEG files.
- Rubber Band - Drawing a line with "Rubber Banding".
- Selecting an area - Drawing a selection area with "Rubber Banding".
- Unicode - An example of adding text to an image in Unicode characters.
- TWAIN - An example of capturing an image from a TWAIN compliant scanner or camera.
- Scanner - ADF - Use of an automatic document feeder (ADF) on a TWAIN scanner.
- Multi-page TIFFs - Shows various processing of multi-page TIFF files.
- C#
- Loading, saving and adding effects - This example is supplied with the trial version.
- Zoom - An example of zooming an image.
- File Info - An example of editing IPTC text and EXIF data in TIFF or JPEG files.
- Rubber Band - Drawing a line with "Rubber Banding".
- Selecting an area - Drawing a selection area with "Rubber Banding".
- Unicode - An example of adding text to an image in Unicode characters.
- TWAIN - An example of capturing an image from a TWAIN compliant scanner or camera.
- Scanner - ADF - Use of an automatic document feeder (ADF) on a TWAIN scanner.
- Multi-page TIFFs - Shows various processing of multi-page TIFF files.
- Visual Basic 5 or 6
- Loading, saving and adding effects - This example is supplied with the trial version.
- Zoom - An example of zooming an image.
- File Info - An example of editing IPTC text and EXIF data in TIFF or JPEG files.
- Rubber Band - Drawing a line with "Rubber Banding".
- Selecting an area - Drawing a selection area with "Rubber Banding".
- Unicode - An example of adding text to an image in Unicode characters.
- TWAIN - An example of capturing an image from a TWAIN compliant scanner or camera.
- Scanner - ADF - Use of an automatic document feeder (ADF) on a TWAIN scanner.
- Multi-page TIFFs - Shows various processing of multi-page TIFF files.
- Access
- Access Demo - Storing images in an Access database and viewing as a report.
- Javascript
- Client Side Example - Description of how to use csXImage in a web browser.
- TWAIN Scanning and Upload - Scanning an image and uploading to a server.
- Load/Save, Resize and Upload - Loading a local image, resizing and saving or uploading to a server.
- ADF Scanning - Scanning multiple pages using an Automatic Document Feeder.
14.6. Deployment of the Control with an Application
In order to deploy an application that uses csXImage you will need to distribute the OCX file, csXImage.ocx, together with the files that make up your application. This file will need to be registered on the machine running your application and you may wish to use a proprietary installer to do this. When csXImage was installed on your system our installer will have copied the OCX file to the directory "Program Files\Chestysoft\csXImage\", assuming you used the installer and accepted the defaults.
The number of copies of the OCX file that may be distributed is not limited by the licence. In order to use the control in a design environment the licence file, csXImage.lic, is also required. The number of machines this may be installed on is governed by your licence agreement and it must not be copied to any more machines than permitted by the licence. Note that this file is required if the control is used on a web server for an ASP or similar application and this would count as one of the installations.
If the control is to be used client side in a web browser, a different system of licensing must be used. This is explained in Section 16.
15. Use in Visual Basic.NET
csXImage can be used in Visual Basic.NET. The full functionality of the control is available, however, some functions require the use of obscure syntax and without some help it can be difficult to get these functions to work.
In this section, these issues are described and the necessary information to enable users of csXImage to use the control successfully in Visual Basic.NET is provided.
15.1. Installation in VB.NET
Install csXImage as usual by running the installer, e.g., csXImageTrial.exe for the trial version. The control will now be registered and available for use.
Open a VB.NET project in which the control is to be used. From the menu, select Tools/Customize Toolbox.
Note that this menu item has different names in different versions of VB.Net. The example here is taken from Visual Studio.NET 2002 where the name is "Customize Toolbox". In later versions of .NET the name is "Add/Remove Items". In Visual Basic 2005 Express Edition, the name is changed again to "Choose Toolbox Items".
The control will now be available in the toolbox as shown below. The class name is 'ImageBox'. Note that the control will appear in whichever section of the Toolbox was open at the time it was added, in this case, the Components section. Instances of the control can now be added to a form in your application.
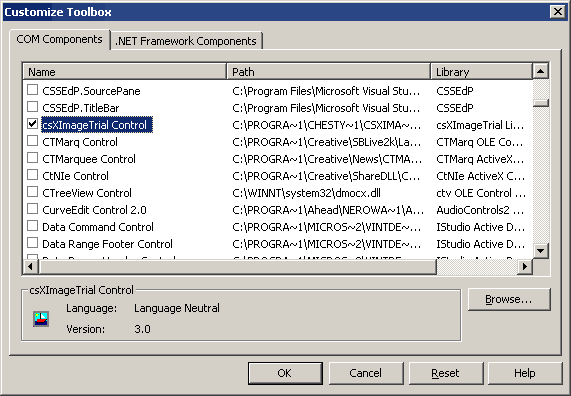
This opens a dialog box with two tabs on it: one for .NET Framework Components and one for COM Components. csXImage is a COM Component and should be available in the list of installed components. Scroll down the list, select csXImageTrial Control and click 'OK'.
15.2. Dynamic Creation of Control Instances
The standard method for using an instance of an ActiveX control in VB.NET is to select the control in the Toolbox and drop it onto a form. This is the recommended way to use csXImage.
It is possible to dynamically create an instance of the control, in code, at runtime. However, this method may lead to runtime errors as the executing code will be unable to find licence information for the control. For this reason, it is not recommended to use csXImage in this way.
If it is necessary to work in this way, Microsoft does publish a solution allowing licensed ActiveX controls to be dynamically created. Information can be found at the following link:
http://support.microsoft.com/default.aspx?scid=kb;en-us;326651
15.3. Enumerations
Many enumerated constants are available in csXImage allowing properties to be set to a value that has a predefined meaningful name rather than an integer. For example, to set the ColorFormat property to monochrome (black and white), the enumeration cfMonoBW can be used, rather than the corresponding integer value, 6.
In VB.NET, these enumerations must be fully referenced using the name of the control, the name of the enumeration class, and finally the enumerated constant itself. The following is an example of the syntax to be used:
AxImageBox1.ColorFormat = csXImageTrial.TxColorFormat.cfMonoBW
For the full version of csXImage, this becomes:
AxImageBox1.ColorFormat = csXImage.TxColorFormat.cfMonoBW
15.4. Events
The declaration of event procedures and the syntax used to reference the event parameters are different in VB.NET than they are in VB5 or 6. For example, the OnMouseMove event has three parameters as follows:
OnMouseMove (ShiftState As Integer, X As Long, Y As Long)
When using this event in VB.NET it is best to create the event procedure by selecting the class name, e.g., AxImageBox1 from the drop down list at the top left of the code window, then select the method name from the list at the top left. In this way, the procedure header will automatically be created, in this case as follows:
Private Sub AxImageBox1_OnMouseMove(ByVal sender As Object, _
ByVal e As AxcsXImageTrial.IImageBoxEvents_OnMouseMoveEvent) _
Handles AxImageBox1.OnMouseMove
This header includes a parameter e which is used to reference the parameters of the event. For example, the parameter X would be referenced as e.X. An example line of code taken from our VB.NET demo is:
If e.x > .ImageWidth - 1 Then
15.5. Colours
In csXImage, colours are of the ActiveX type OLE_COLOR. When used in VB.NET, these are used differently depending whether they are properties or parameters in a method call.
To set the value of a colour property, such as BGColor, the background colour of the image, the type System.Drawing.Color is used. For example, the following code sets BGColor to blue:
AxImageBox1.BGColor = Color.Blue
A colour can also be selected by its hexadecimal RGB value using the FromArgb function, e.g.:
AxImageBox1.BGColor = Color.FromArgb(&HCC00CC)
When the colour is a parameter in a method call as in the ColorCount function, it must be converted to type UInt32 (unsigned 32-bit integer). The following syntax is required:
AxImageBox1.get_ColorCount(Convert.ToUInt32(ColorTranslator.ToOle(Color.Red)))
15.6. Fonts
The TextFont property has sub-properties such as TextFont.Name, TextFont.Size etc. When used in VB.NET, these sub-properties are read-only. To set the font properties, an new object of type Font must be created with the appropriate values and TextFont set equal to this new font.
For example, the following code sets TextFont to Arial with a size of 15 and bold.
AxImageBox1.TextFont = New Font("Arial", 15, FontStyle.Bold)
Alternatively, the sub-properties can be accessed directly using the properties TextFontName etc., as follows:
AxImageBox1.TextFontName = "Arial"
AxImageBox1.TextFontSize = 15
AxImageBox1.TextFontBold = True
15.7. Indexed Properties
Some properties of csXImage have one or more parameters. An example is the PixelColor property which returns the colour of a specific pixel in an image and has parameters X and Y giving the co-ordinates of the pixel.
In VB.NET, these properties are not supported directly. They can be accessed for reading or writing by methods prefixed with get_ or set_ respectively. For example, the PixelColor property can be read using the following syntax:
ColorValue = AxImageBox1.get_PixelColor(X, Y)
15.8. Exchanging Images with PictureBox Control
Images can be copied from csXImage to the .NET PictureBox control using the following line of code:
PictureBox1.Image = AxImageBox1.Picture
Copying in the other direction, from a PictureBox to csXImage, is more difficult. The following code can be used:
Dim AStream As IO.MemoryStream
Dim BMPArray As Byte()
AStream = New IO.MemoryStream()
PictureBox1.Image.Save(AStream, Imaging.ImageFormat.Bmp)
BMPArray = AStream.ToArray
AxImageBox1.ReadBinary2(BMPArray)
15.9. Creating an Installer for a VB.NET Project
An installation package (.msi file) which includes the necessary files for deploying csXImage can easily be created in VB.NET using the Setup Wizard. With your project already open in the .NET development environment, complete the following steps. Note that these instructions were written based on Visual Studio.NET 2002 and may differ slightly in other versions.
From the menu, select File/New/Project.
Select 'Setup and Deployment Projects' and 'Setup Wizard'. Select the option 'Add to solution'. Give your setup project a name and browse to the directory where the setup project will be saved. Click 'Ok' to start the wizard. Click 'Next'.
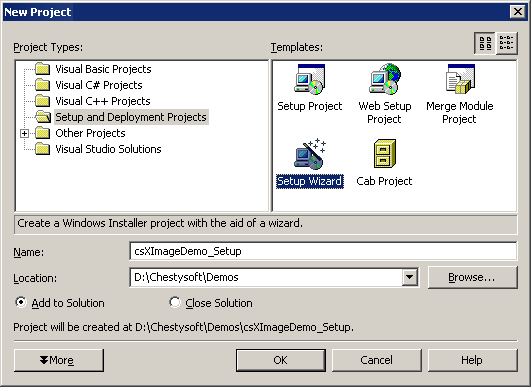
Select 'Create a setup for a Windows application' and click 'Next'.
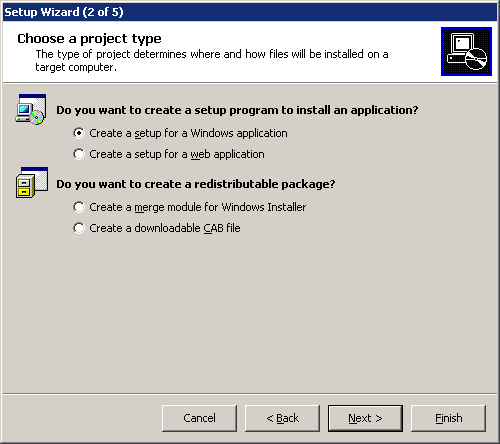
Check the box labelled 'Primary Output from (your project name)'. Click 'Next'.
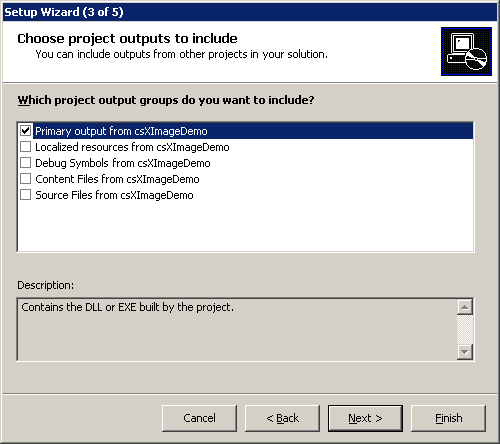
The next window asks for any additional files to be added. None are required for csXImage, but you may have other files to add for your project at this point. When ready, click 'Next' and then 'Finish'.
You may now see a message warning that dependencies of csXImage could not be determined automatically. This message can be ignored. Click 'Ok' to continue.
The setup project has now been added to your main project as a second project in the solution. Select the name of the setup project in the Solution Explorer, do a right mouse click and select Build. The .msi file will now be built.
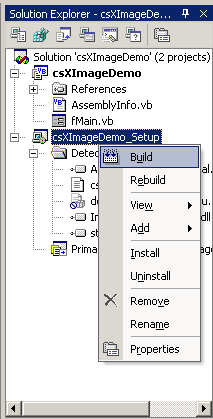
This file can now be distributed to end users of your application and contains all the necessary files for using csXImage in a compiled application.
15.10. Miscellaneous VB.NET Issues
Versions of Visual Studio 2005 or later may raise an error "LoaderLock was detected" when attempting to run any TWAIN related functions. This is due to an external library (TWAIN_32.DLL) being accessed. To prevent this error go to the Debug menu in Visual Studio, select Debug/Exceptions, then under Managed Debugging Assistants, uncheck LoaderLock in the Thrown column.
16. Use as a Client Side Control in a Browser
csXImage can be used in a browser as a client side control using Javascript (or VBScript). For users of the licensed version of the control (not the trial version), a signed CAB file is available for this purpose.
16.1. The Licence File
csXImage is a licensed control. It is priced by the number of design time licences required, and that means the number of copies needed of the file csXImage.lic (csXImageTrial.lic for the trial version). When using the control in a web browser, an alternative way of distributing the licence information must be used, so that each client machine can use the licence present on the server. This is done using an LPK (licence package) file, which counts as a .lic file for the purpose of determining the number of licences in use.
An LPK file is provided in the installation package for csXImage and can be found in the directory "Program Files\Chestysoft\csXImage\" assuming the default location was used for installation. Alternatively, an LPK file can be created using the Microsoft LPK File Generation Tool, which can be downloaded from the Microsoft web site, by clicking here.
The following HTML is used to call up the LPK file:
<OBJECT CLASSID="clsid:5220cb21-c88d-11cf-b347-00aa00a28331"><PARAM NAME="LPKPath" VALUE="csximage.lpk"></OBJECT>
This class ID is used for all LPK files. The name shown in the VALUE attribute is the name used when creating the LPK file. It is possible to include the licence information for several OCX controls in the same LPK file.
Important note: The LPKPath attribute must contain a relative path and must not use a full URL starting with "http://". Presumably this is to prevent LPK files from being called from other web sites, but a full URL will fail even if it points to the same web site.
16.2. Distributing the OCX File
The client computer will need a copy of the OCX control in order to run an application using it. For a small number of clients it would be feasible to copy and register the .ocx file onto each machine. This file is csXImage.ocx (csXImageTrial.ocx for the trial version). The .ocx file can be distributed royalty free providing the .lic file is not distributed.
The control can be downloaded the first time the client accesses the page that uses it. To do this the .ocx file can be packaged into a CAB file and included in the CODEBASE attribute of the OBJECT tag. We provide a digitally signed CAB file with the full version, but not with the trial version.
16.3. Calling the Control
The following HTML is used to call up the control. First for the trial version:
<OBJECT ID="csxi" CLASSID="clsid:D7EC6EC3-1CDF-11D7-8344-00C1261173F0" CODEBASE="csximagetrial.cab"></OBJECT>
Then for the full version:
<OBJECT ID="csxi" CLASSID="clsid:62E57FC5-1CCD-11D7-8344-00C1261173F0" CODEBASE="csximage.cab"></OBJECT>
The object name is specified in the ID attribute. This can be any name and it will be used to call properties and methods of the object. If the OCX is included in a CAB file the path to this file will be specified in the CODEBASE attribute.
At the time of writing, the current version of Internet Explorer (IE11) does not have separate 32-bit and 64-bit versions. The bitness of the process is determined by whether or not Enhanced Protected Mode (EPM) is used. The 32-bit version of the control should always be used and EPM should be disabled.
16.4. Changing the Version Number
If a more recent version of the csXImage control is used in a web application it is necessary to create a new LPK file using this version. The complete version and build number can be specified in the CODEBASE attribute and this will force the client browser to download the CAB file again if it is using an earlier version. The syntax is:
CODEBASE="csximage.cab#version=5,0,6,0"
To find the exact version, right click on the OCX file and select "Properties". Do not right click on the CAB file or the executable installer.
16.5. Security Settings in Internet Explorer
Internet Explorer has security settings that may restrict the use of ActiveX controls. These settings can be accessed by selecting Tools/Internet Options from the menu, then selecting the Security tab and clicking on the Custom Level button. The security level can be set to 'Enable', Disable' or 'Prompt'. If the 'Disable' option is selected, the control will not be able to run. It should be noted that there are separate settings for Signed and Unsigned ActiveX controls, so different behaviour may be seen for the trial version of the control and the digitally signed CAB file of the full version.
16.6. Examples
A simple example web page showing the use of csXImage as a client side control using Javascript is provided with the csXImage installation and can be accessed from the Windows Start Menu. In addition we have four other examples available on our web site:
- Client Side Example - Description of how to use csXImage in a web browser, and simple live demo.
- TWAIN Scanning and Upload - Scanning an image and uploading to a server.
- Load, Resize and Upload - Selecting a local image, resizing it and uploading to a server.
- ADF Scanning - Scanning multiple pages using an Automatic Document Feeder.
17. Revision History
The current version of csXImage is 5.0. Recent improvements (since version 3.1) include:
New in Version 3.1
Exif data editing.
Support for Exif data in TIFF files.
InsertPDF function.
New TWAIN functions (TwainThreshold, TwainMaxWidth, TwainMaxHeight, ADFLoaded, UnloadTwain).
LoadDialog and SaveDialog methods.
ReadBinary and WriteBinary support multi-page TIFFs.
PrinterCount, PrinterName and PrintPaperSize properties.
New drawing methods.
AddCursor, JPEGApproxQuality, IsBlank, PostReturnCode.
New in Version 3.2
ResizeFit function.
ScrollSpeed property.
Redraw method.
HTTPUserAgent property.
PrintPaperSource property.
Properties for customising printer dialogue text.
Can preserve ICC colour profiles in JPEG files.
KeepTwainInterfaceOpen property.
ReadMetaData method.
New TWAIN functions for file transfer (AcquireToFile, TwainFileTransferSupported, TwainFileFormat, TwainFileFormatAllowed).
New in Version 3.3
Support for alpha transparency.
PostReturnFile property.
AuthenticationType property.
Functions related to manipulation of colour palettes.
CopyBinaryFromURL method.
PixelArray and BytesPerRow properties.
hWnd property.
JPEGHigherSpeed property.
New in Version 3.4
WriteTIFDialog, WritePDFDialog methods.
TextTransparency property.
TextFontName, TextFontSize etc. properties.
BlankBorder property.
TwainAutoBorder property.
HTTPTimeout property.
Functions to support HLS colour space (HLSAdjust etc.).
XMP support for JPEG files and TIFF files.
MouseSelectToEdge property.
PDFTitle, PDFSubject etc. properties.
New in Version 3.5
Deskew and Autocrop methods and related functions.
AcquireMultiFile method.
TWAIN MICR functions.
XP meta data properties and DeleteTrailingData method.
File drag & drop.
Image transfer by FTP.
SelectTwainDeviceByName method.
OriginalFormat property.
ConvertEventXY method.
New in Version 4.0
Full compatibility with version 2.1 of the TWAIN specification.
Properties for managing TWAIN versions.
TwainResCount and TwainResAllowedValue properties.
TwainDefaultDevice property.
UnloadTwainDevice method.
Version property.
New in Version 5.0
64-bit version of csXImage.
Full compatibility with version 2.3 of the TWAIN specification.
18. Other Products From Chestysoft
ActiveX Controls
csXGraph - An ActiveX control to draw pie charts, bar charts and line graphs.
ASP Components
csImageFile - Similar functionality to csXImage but in an ASP component.
csImageLite/a> - A cut-down version of csImageFile for resizing and merging images.
csDrawGraph - Draw pie charts, bar charts and line graphs in ASP.
csASPGif - Create and edit animated GIFs.
csASPUpload - Process file uploads through a browser.
csASPZipFile - Create zip files and control binary file downloads.
csFileDownload - Control file downloads with an ASP script.
csFTPQuick - ASP component to transfer files using FTP.
ASP.NET Components
csASPNetGraph - .NET component for drawing pie charts, bar charts and line graphs.
csNetDownload - ASP.NET class to control file downloads.
Web Hosting
We can offer ASP enabled web hosting with our components installed. Click for more details.
19. Enumerations
For reference, the enumerated constants used in csXImage correspond to the following numerical values:
| bsSolid | 0 |
| bsClear | 1 |
| bsHorizontal | 2 |
| bsVertical | 3 |
| bsBDiagonal | 4 |
| bsFDiagonal | 5 |
| bsCross | 6 |
| bsDiagCross | 7 |
| cf24Bit | 0 |
| cf256Color | 1 |
| cf256GrayScale | 2 |
| cf16Color | 3 |
| cf16GrayScale | 4 |
| cfMono | 5 |
| cfMonoBW | 6 |
| cfNone | 7 |
| cmNone | 0 |
| cmPackBits | 1 |
| cmGroup4 | 2 |
| fmHoriz | 0 |
| fmVert | 1 |
| fsSurface | 0 |
| fsBorder | 1 |
| gfBMP | 0 |
| gfGIF | 1 |
| gfJPG | 2 |
| gfPCX | 3 |
| gfPNG | 4 |
| gfWBMP | 5 |
| gfPSD | 6 |
| gfTIF | 7 |
| gfPDF | 8 |
| gfNone | -1 |
| pmBlack | 0 |
| pmWhite | 1 |
| pmNop | 2 |
| pmNot | 3 |
| pmCopy | 4 |
| pmNotCopy | 5 |
| pmMergePenNot | 6 |
| pmMaskPenNot | 7 |
| pmMergeNotPen | 8 |
| pmMaskNotPen | 9 |
| pmMerge | 10 |
| pmNotMerge | 11 |
| pmMask | 12 |
| pmNotMask | 13 |
| pmXor | 14 |
| pmNotXor | 15 |
| psSolid | 0 |
| psDash | 1 |
| psDot | 2 |
| psDashDot | 3 |
| psDashDotDot | 4 |
| psClear | 5 |
| ptBW | 0 |
| ptGray | 1 |
| ptRGB | 2 |
| ptPalette | 3 |
| ptUnknown | -1 |
| poPortrait | 0 |
| poLandscape | 1 |
| pucm | 0 |
| puInch | 1 |
| seNone | 0 |
| seRectangle | 1 |
| seEllipse | 2 |
| tjLeft | 0 |
| tjCenter | 1 |
| tjRight | 2 |
| tfTIFF | 0 |
| tfPICT | 1 |
| tfBMP | 2 |
| tfXBM | 3 |
| tfJPEG | 4 |
| tfFPX | 5 |
| tfTIFFMulti | 6 |
| tfPNG | 7 |
| tfSPIFF | 8 |
| tfEXIF | 9 |
| tfPDF | 10 |
| tfJP2 | 11 |
| tfJPX | 13 |
| tfDJVU | 14 |
| tfPDFA | 15 |
| tfPDFA2 | 16 |
| tfUnknown | -1 |
| unInches | 0 |
| unCentimeters | 1 |
| unPicas | 2 |
| unPoints | 3 |
| unTwips | 4 |
| unPixels | 5 |
| unMillimeters | 6 |
| unUnknown | -1 |
| wmCentre | 0 |
| wmSingle | 1 |
| wmTile | 2 |
| wmWrap | 3 |
Note that not all programming environments (e.g., Javascript) support the use of these enumerated constants. In such cases, the numerical values must be used instead.
20. Alphabetical List of Functions
Click on one of the links below to go directly to information about that function:
- AboutBox
- Acquire
- AcquireMultiFile
- AcquireToFile
- AddCursor
- AddFormVar
- AddToPDF
- AddToTIF
- ADFLoaded
- AlphaDisplayBackground
- AlphaHDC
- AlphaPixel
- AlphaText
- Antialias
- Arc
- Arc3XY
- AutoCrop
- AutoScale
- AutoZoom
- BackgroundColor
- BezierPointAdd
- BlankBorder
- BlankTol
- Blur
- BlurBy
- BMPHandle
- Brightness
- BrushColor
- BrushStyle
- BytesPerRow
- CancelSelection
- CanDisableTwainInterface
- CaptureScreen
- CaptureWindow
- Chord
- CircleCR
- Circle3XY
- Clear
- ClearAlpha
- ClearICCProfile
- ClearMetaData
- ClearPDF
- ClearTIF
- ClosePDF
- ColorCount
- ColorIndex
- ColorFormat
- ColorReplace
- CombineAlphaWithBG
- CombineColors
- Compression
- Contrast
- ConvertEventXY
- Copy
- CopyBinaryFromURL
- Crop
- CropToSelection
- CurrentTwainDevice
- Cursor
- DeleteTIF
- DeleteTrailingData
- Deskew
- DeskewAngle
- DeskewMaxAngle
- Despeckle
- DespeckleTol
- DetectBorder
- DetectBorderWhite
- DragDropActive
- DragDropCancel
- DragDropFileName
- DrawLine
- DrawText
- Ellipse
- ExifAttributeName
- ExifClear
- ExifCount
- ExifDataCount
- ExifDataType
- ExifDateToString
- ExifDelete
- ExifName
- ExifSetAttribute
- ExifStringToDate
- ExifUserComment
- ExifValueByIndex
- ExifValueByName
- ExtraAlphaValue
- FFO_Author
- FFO_AuthorsPosition
- FFO_Byline
- FFO_BylineTitle
- FFO_Caption
- FFO_CaptionWriter
- FFO_Category
- FFO_CiAdrCity
- FFO_CiAdrCtry
- FFO_CiAdrExtAdr
- FFO_CiAdrPcode
- FFO_CiAdrRegion
- FFO_CiEmailWork
- FFO_CiTelWork
- FFO_City
- FFO_CiUrlWork
- FFO_Clear
- FFO_CopyrightFlag
- FFO_CopyrightNotice
- FFO_CountryCode
- FFO_CountryName
- FFO_Credit
- FFO_CustomField1
- FFO_DateCreated
- FFO_DateReleased
- FFO_EditStatus
- FFO_FixtureIdentifier
- FFO_Headline
- FFO_HasContactInfo
- FFO_ImageNotes
- FFO_ImageURL
- FFO_IntellectualGenre
- FFO_Keywords
- FFO_KeywordsAdd
- FFO_KeywordsClear
- FFO_KeywordsCount
- FFO_KeywordsDelete
- FFO_KeywordsInsert
- FFO_Load
- FFO_Marked
- FFO_MarkedDefined
- FFO_LocalCaption
- FFO_ObjectCycle
- FFO_ObjectName
- FFO_OriginatingProgram
- FFO_OTR
- FFO_ProgramVersion
- FFO_ProvinceState
- FFO_Rating
- FFO_RatingPercent
- FFO_ReferenceDate
- FFO_ReferenceNumber
- FFO_ReferenceService
- FFO_RightsUsageTerms
- FFO_Save
- FFO_Scene
- FFO_SceneAdd
- FFO_SceneClear
- FFO_SceneCount
- FFO_SceneDelete
- FFO_SceneInsert
- FFO_Source
- FFO_SpecialInstructions
- FFO_SubjectCode
- FFO_SubjectCodeAdd
- FFO_SubjectCodeClear
- FFO_SubjectCodeCount
- FFO_SubjectCodeDelete
- FFO_SubjectCodeInsert
- FFO_Sublocation
- FFO_SuppCat
- FFO_SuppCatAdd
- FFO_SuppCatClear
- FFO_SuppCatCount
- FFO_SuppCatDelete
- FFO_SuppCatInsert
- FFO_TimeCreated
- FFO_TimeReleased
- FFO_Title
- FFO_Urgency
- FilterType
- FindUnusedColor
- Flip
- FloodFill
- FloodFillColor
- FloodFillStyle
- FTPImage
- FTPError
- FTPPassiveMode
- GetSelectionCoords
- HasADF
- HasAlpha
- HasBackground
- HasFileInfo
- HasICCProfile
- HasScrollBarHoriz
- HasScrollBarVert
- HasXMP
- Height
- HLSAdjust
- HLSToRGB
- HTTPTimeout
- HTTPUserAgent
- hWnd
- ImageCount
- ImageCountBinary
- ImageCountBinary2
- ImageHeight
- ImageLoaded
- ImageWidth
- InsertPDF
- InsertTIF
- Invert
- IsBlank
- JPEGApproxQuality
- JPEGApproxQualityError
- JPEGHigherSpeed
- JPEGQuality
- KeepExifThumbnail
- KeepICCProfile
- KeepScrollPos
- KeepTwainInterfaceOpen
- KeepXMP
- Left
- LastFileName
- LoadAlphaAsBMP
- LoadDialog
- LoadFromFile
- LoadFromURL
- LoadPDFImage
- MergeBinary
- MergeFile
- MergeHandle
- MergeLeft
- MergeReverse
- MergeStyle
- MergeTop
- MergeTransparency
- MergeTransparent
- MergeTransparentColor
- MouseSelectEllipse
- MouseSelectRectangle
- MouseSelectToEdge
- NewAlpha
- NewFileSize
- NewImage
- OnAcquire
- OnAcquireCancel
- OnAcquireFinish
- OnClick
- OnDblClick
- OnDragDrop
- OnMouseDown
- OnMouseMove
- OnMouseUp
- OnScroll
- OnStartDragDrop
- OpenPDF
- OpenPDFDialog
- OpenPDFFromURL
- OriginalFormat
- OverwriteMetaData
- PaletteEntry
- PaletteSize
- PaletteToAlpha
- Paste
- PDFAuthor
- PDFImageCount
- PDFKeyWords
- PDFSubject
- PDFTitle
- PDS_Cancel
- PDS_Centre
- PDS_Copies
- PDS_Fit
- PDS_Landscape
- PDS_Left
- PDS_Orientation
- PDS_Paper
- PDS_PaperDefault
- PDS_Portrait
- PDS_Position
- PDS_Print
- PDS_Printer
- PDS_Scale
- PDS_Title
- PDS_Top
- PDS_Units
- PenColor
- PenMode
- PenStyle
- PenWidth
- Picture
- PictureData
- Pie
- PixelArray
- PixelColor
- PointAdd
- Polybezier
- Polygon
- PostImage
- PostReturnCode
- PostReturnFile
- PrintCentre
- PrintCopies
- PrinterCount
- PrinterIndex
- PrinterName
- PrintFit
- PrintImage
- PrintLeft
- PrintOrientation
- PrintPaperSize
- PrintPaperSource
- PrintScale
- PrintTitle
- PrintTop
- PrintUnits
- ProgressiveJPEG
- RationalToReal
- ReadBase64
- ReadBinary
- ReadBinary2
- ReadImageNumber
- ReadMetaData
- RealToRational
- Rectangle
- Redraw
- ReduceRedEye
- ReleaseBMPHandle
- Resample
- ResizeFit
- ResizeImage
- RGBToHue
- RGBToLightness
- RGBToSaturation
- Rotate
- RoundRect
- SaveAlphaAsBMP
- SaveDialog
- SaveToFile
- ScaleImage
- ScaleToGray
- ScrollBarHorizPos
- ScrollBarHorizWidth
- ScrollBarVertHeight
- ScrollBarVertPos
- ScrollSpeed
- SelectEllipse
- SelectionType
- SelectionVisible
- SelectionX1
- SelectionX2
- SelectionY1
- SelectionY2
- SelectPrinterByName
- SelectRectangle
- SelectTwainDevice
- SelectTwainDeviceByName
- SetTwainLayout
- Sharpen
- SharpenBy
- ShowScrollBars
- ShowTwainProgress
- TextAngle
- TextFont
- TextFontBold
- TextFontItalic
- TextFontName
- TextFontSize
- TextHeight
- TextJustify
- TextTransparency
- TextTransparent
- TextWidth
- Top
- Transparent
- TransparentArray
- TransparentColor
- TransparentPalette
- TwainAppName
- TwainAutoBorder
- TwainAutoBright
- TwainAutoDeskew
- TwainBottom
- TwainBrightness
- TwainBrightnessMax
- TwainBrightnessMin
- TwainBrightnessStep
- TwainBusy
- TwainCallbackMode
- TwainConnected
- TwainContrast
- TwainContrastMax
- TwainContrastMin
- TwainContrastStep
- TwainDefaultDevice
- TwainDevice2x
- TwainDeviceCount
- TwainDeviceName
- TwainDeviceVersion
- TwainDSM2x
- TwainDSMPath
- TwainDuplexEnabled
- TwainDuplexSupported
- TwainFileFormat
- TwainFileFormatAllowed
- TwainFileTransferSupported
- TwainImagesToRead
- TwainLeft
- TwainMaxHeight
- TwainMaxWidth
- TwainMICREnabled
- TwainMICRHandle
- TwainMICRString
- TwainMultiImage
- TwainPageCount
- TwainPixelType
- TwainPixelTypeAllowed
- TwainResAllowedValue
- TwainResCount
- TwainResMax
- TwainResMin
- TwainResolution
- TwainResStep
- TwainRight
- TwainThreshold
- TwainTop
- TwainUnits
- TwainUnitsAllowed
- TwainUseNewDSM
- UnloadTwain
- UnloadTwainDevice
- URLPassword
- URLUserName
- UseADF
- UseAuthenticationDialog
- UsePrintDialog
- UseSelection
- UseTwainInterface
- Version
- Visible
- WaitForAcquire
- WasCMYK
- Width
- WriteBase64
- WriteBinary
- WritePDF
- WritePDFDialog
- WriteTIF
- WriteTIFDialog
- XDPI
- XMPClear
- XMPPriority
- XP_Author
- XP_Comments
- XP_Keywords
- XP_Subject
- XP_Title
- XPelsPerMeter
- XTwainResMax
- XTwainResMin
- XTwainResolution
- XTwainResStep
- YDPI
- YPelsPerMeter
- YTwainResMax
- YTwainResMin
- YTwainResolution
- YTwainResStep
- Zoom
- ZoomedHeight
- ZoomedWidth
- ZoomToSelection